Customize your Recording Player for both On-Demand and Live Webinars.You can edit as needed, when needed, and save time during the conversion from live to recording.
New as of 01/03/2023: Set your recording's pop-up offer to display full screen during your recording or slide out.
The Recording Player allows you to add customizations to your On-Demand recordings, like adding automated Chats, and other interactive features like polls, handouts and Q&A.It's a great way to keep your live webinar's branding and messaging consistent when converting to an on-demand webinar.You are able to make the process more efficient when editing and customizing, as you can edit the recording player beforehand, when your event is live, and afterwards when it's been converted.This way, you can edit as needed, when needed, which saves time and minimizes the risk of error.Learn more below about customizing your recording player.

Table of Contents:
1.The Recording Player Settings
3.FAQs
Can I customize the On-Demand Webinar Player before my event goes live?
- How do I delete my Recording?
The Recording Player Settings
You can access the Recording Player a few ways:
- TheEdit Recording Playersection on the Manage Webinar dashboard
- Edit Video Playeron your On-Demand recording
- Edit Playerunder your On-Demand recording
Any of those three ways will take you to Recording Player where you will have access to add customizations.
Customize Player
Within the Customize Player, you are able to add color, branding and adjust the settings of the player.You can adjust the player's color and theme color, as well as use the BigMarker logo image or your own custom image.
You are able to adjust the following settings:
- Limit number of playbacks per viewer- limit the amount of playbacks a viewer is allowed.If set to 0, then the amount will be unlimited
- Allow video auto play- the video will automatically play
- Allow video loop play- the video will loop to the beginning when it has ended
- Allow viewers to seek and skip ahead- allow viewers to click to certain parts in the recording and seek out different sections
- Enable 3D Player- viewers are able to click and drag the video when uploaded with 3D components
- Save as default- saves the Customize Player settings for following on-demand recordings
- Allow viewers to adjust video playback speed- allow viewers to adjust the video playback speed, wether it be
- Show closed captions- display closed captions in your recording
Note: You must have closed captions enabled and transcribed in order to do this.Click here to learn more.
- When the number of subtitles exceeds # of characters, the exceeding content will be displayed to the next scene- set the amount of characters of subtitles that can be shown at once.
- Redirect at end of the video- add a redirect link for the viewer to redirect to.This can be a survey link or a custom URL
- Show webinar survey in video player at end of the video- add a post-webinar survey to the recording for your viewer to answer.
Thumbnail
Customize the preview image or text overlay that happens after clicking play and before the recording starts.You can add a Media thumbnail, which is a static image that displays before the recording starts.You can upload an image and remove it to upload a new image
Below is an example of a media thumbnail for a recording:

You can also incorporate a text overlay as well. In the Text section, enable on the text and include what you would like the message to say over the image thumbnail.Below is an example of a thumbnail with text.

Edit Video
Note: The ability to edit the video (in the section below) is for Enterprise and Event Packages plan holders.If interested, please contact our Events Experts at sales@bigmarker.com
Here, edit the recording by inserting timestamps of the parts of your recording you would like to keep.Essentially, this is the section where you are able to trim out any unwanted disruptions, pauses or breaks from your recording to create a seamless video.
ClickAdd Another Segmentto enter in the start and stop time of the segment you would like to keep.Keep clickingAdd Another Segmentuntil you have all the segments you would like to include for your recording.You can preview the flow of the segments by clickingPreview All Segmentsat the bottom.When finished, clickSave & Reprocess the Video.

You can view a history of all recording versions in theSaved Versionssection, where you can also restore any previous versions as well.
These are the basic settings available to you to edit your recording players.In addition to the settings, you are able to add interactive features, such as polls, handouts, pop-up offers, Q&A and handouts.
Interactive Features
Incorporate the same great engagement and interactive features from your live events into your recordings.
Adding Polls
1.Click on thePollssection, thenenablePolls
2.ClickAdd Pollsand add the polls you would like to incorporate into your recording.
3.Enter in the start and stop times you would like the poll to appear and disappear at
4.ClickSave

You can continue to add more polls by clickingAdd Another Pollat the bottom.To get rid of the poll, clickDiscard.These will appear as overlays over your video.Below is an example of a poll in a recording:

Adding Handouts
1.Click on theHandoutssection, thenenableHandouts.
2.Select what type of handout you would like to include in your recording: File or Link
- For a File Handout, upload the file of choice
- For Link Handout, give your handout a title and enter in the link for the handout
3.For each handout,enableto display in your recording
4.Enter in the time you would like the handout to display.

5.ClickSave
You can preview when the handout will show in your recording by clickingPreviewunder the handout.To delete the handout, clickDiscard.
Additionally, if you convert a live webinar into an on-demand webinar, any handouts uploaded to the live webinar will automatically be added to this section.You will still need to enable the handouts and configure the display time manually.
Your handouts will display in a pop-out view in the recording when the designated time has been reached.Viewers can click the handout icon in the recording to download or be redirected to the handout.Below is an example of a handout in a recording:

Adding Pop-Up Offers
1.Click on thePop-Up Offerssection, thenenablePop-Up Offers.
2.ClickAdd Another Offer
3.Enter in the Offer'scontent:
- Title
- CTA
- Text 1
- Text 2
- Button Text
- Link
4.Enter in the start and end time you would like the offer to appear and disappear at.
5.Click theDesignsection to add an image, adjust the display type and change the button color.
- For the Display Type, you can choose this to be eitherfull screenorslide out.When slide out is selected, you can opt to have the offer in alightordarkmode.
6.ClickSave

For each offer,enableto display in your recording.You can add more offers by clickingAdd Another Offer.To delete, clickDiscard.
Your offer will show as the display type selected in the Design section.If Full was selected, a full-screen overlay will show to viewers.They can click the button to view the offer or clickNo thanksin the top right hand corner on the recording to exit the offer.Below is an example of a full-screen offer in a recording:

If you selected slide out, this will slide out and take up the left hand side of the screen.Below are examples of a slide out offer in both light and dark mode:
Light Mode:

Dark Mode:

Adding Q&A
Q&A allows your viewers to submit a question when watching the recording. You can ask for the viewer's first name, last name and email address.You can enable Q&A on or off depending on if you would like Q&A for the recording.
Additionally, you can send an email notification to the webinar creator or presenter.Check offSend Email Notificationand select from the dropdown menu who you would like to receive the question.
Note:You can also set who receives email notifications in theEdittab, underAdvanced Settingssection by checking offOn-Demand Question Email and entering in the email addresses of the recipients in the text box below.


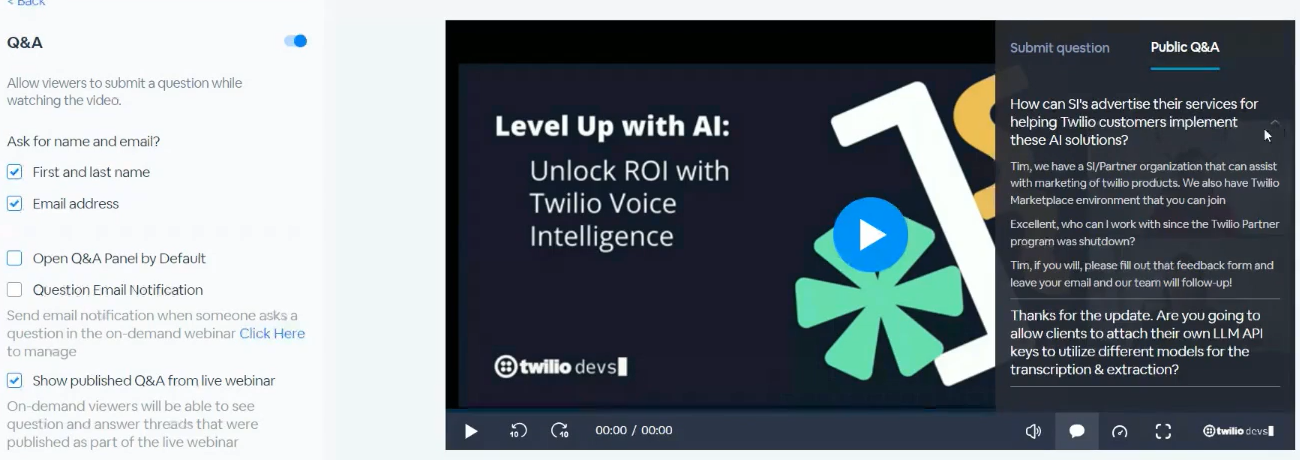
Below is a view of the Q&A submission form viewers can submit Q&A during the recording:


Note:Any Q&A submitted during the on-demand recording will be included in the transcript.
You can customize what your Q&A form will ask viewers to better align with your on-demand recording or live event.You can edit the form's title, subtitle, first and last name text, question text and CTA button text.

Publish Q&A in the video player
When editing the on-demand video player, there is now a new option to show questions from the live webinar.Enabling this will show the entire thread from each question that has been published.
Note: a questionmustbe published from the live webinar in order to show here.
Adding Chats
You can add either the live chats or automated chats to your recordings.The live chats are the chats that were in your live webinar, while automated chats are customized chats to appear at certain times within your recording.
Note:To learn more about adding automated chats to your recordings, clickhere.
1.Click on the Chats section, thenenableChats.
2.You can enable on or off:
- Live chats- the viewer will see the live chats from the webinar
- Automated chats- the viewer will see the automated chats you created
- Display chats in Chat Drawer- chats will only be seen in the pop-out drawer
- Show timestamps- chats will have the timestamp of when they were submitted
- When the Chat Drawer is closed, display Chat Bubbles over the video- if the Chat Drawer is closed, the chats will appear as bubbles over the video
- Open chat drawer by default- the Chat Drawer will be open on default when watching the recording.

You can choose the style of the chat bubbles, either making them in white or black.
After customizing the settings and adding your desired interactive features, you are able toSave and Exit.The changes will show in the On-Demand recording.Additionally, you can clickEmbed and Shareat the top, to copy the embed code so you can embed the recording in any websites or social media platforms.
With the embed code, you can choose to embed the recording in afixed dimensionorresponsive dimension.Using the fixed dimension option will let you control and set the width and height of the recording, while the responsive option will adjust the size based on the container it's put into.

FAQs
Can I customize the On-Demand Webinar Player before my event goes live?
- Yes!You can create a live webinar and add your desired customizations to the on-demand video player (using the steps above) or create a live webinar template and add customizations then.Once you save this template, you can easily use the same logo, colors, graphics, etc.for future live-to-on-demand sessions without needing to create and design another on-demand video player.
Note:The video present in theEdit Recording Playertabwill be switched out once the Live Webinar is converted to On-Demand.
How do I delete my Recording?
By default, all recorded webinars become On-Demand webinars.To delete a recorded webinar completely, clickMoreand thenDelete Webinar.

If you don't want to delete the recording, you can alsoUnpublishthe recording so that it's only available to admins on the dashboard.

You can replace an old recording by clickingUpload New Recordingbelow the video player.Simply drag and drop your new MP4 file or use theBrowsebutton to replace your old recording.


Note:We recommend downloading your original recording before adding a new recording.