The BigMarker platform has built-in registration and ticket sales, so your virtual event's ticketing and registration is integrated with the rest of your event software.
New as of 10/20/2022: Create Allow Lists to manage all registrants allowed to purchase or select specific ticket passes in one central location.
On BigMarker, you can create different pass types with varying permissions, privileges and price points.Follow the steps below to create these pass types on BigMarker.
Table of Contents
2.How to Create a Regular Pass
3.How to Create a Subscription Pass
4.How to Edit the Notifications for Subscription Passes
5.How to Design Subscription Passes
How to Create Pass Types
Registration and ticket types can be found on your event's dashboard.Log into your channel, go to your Main Series, then selectManage Eventdashboard.From there, navigate to theRegistration & Passessection on the left hand side.

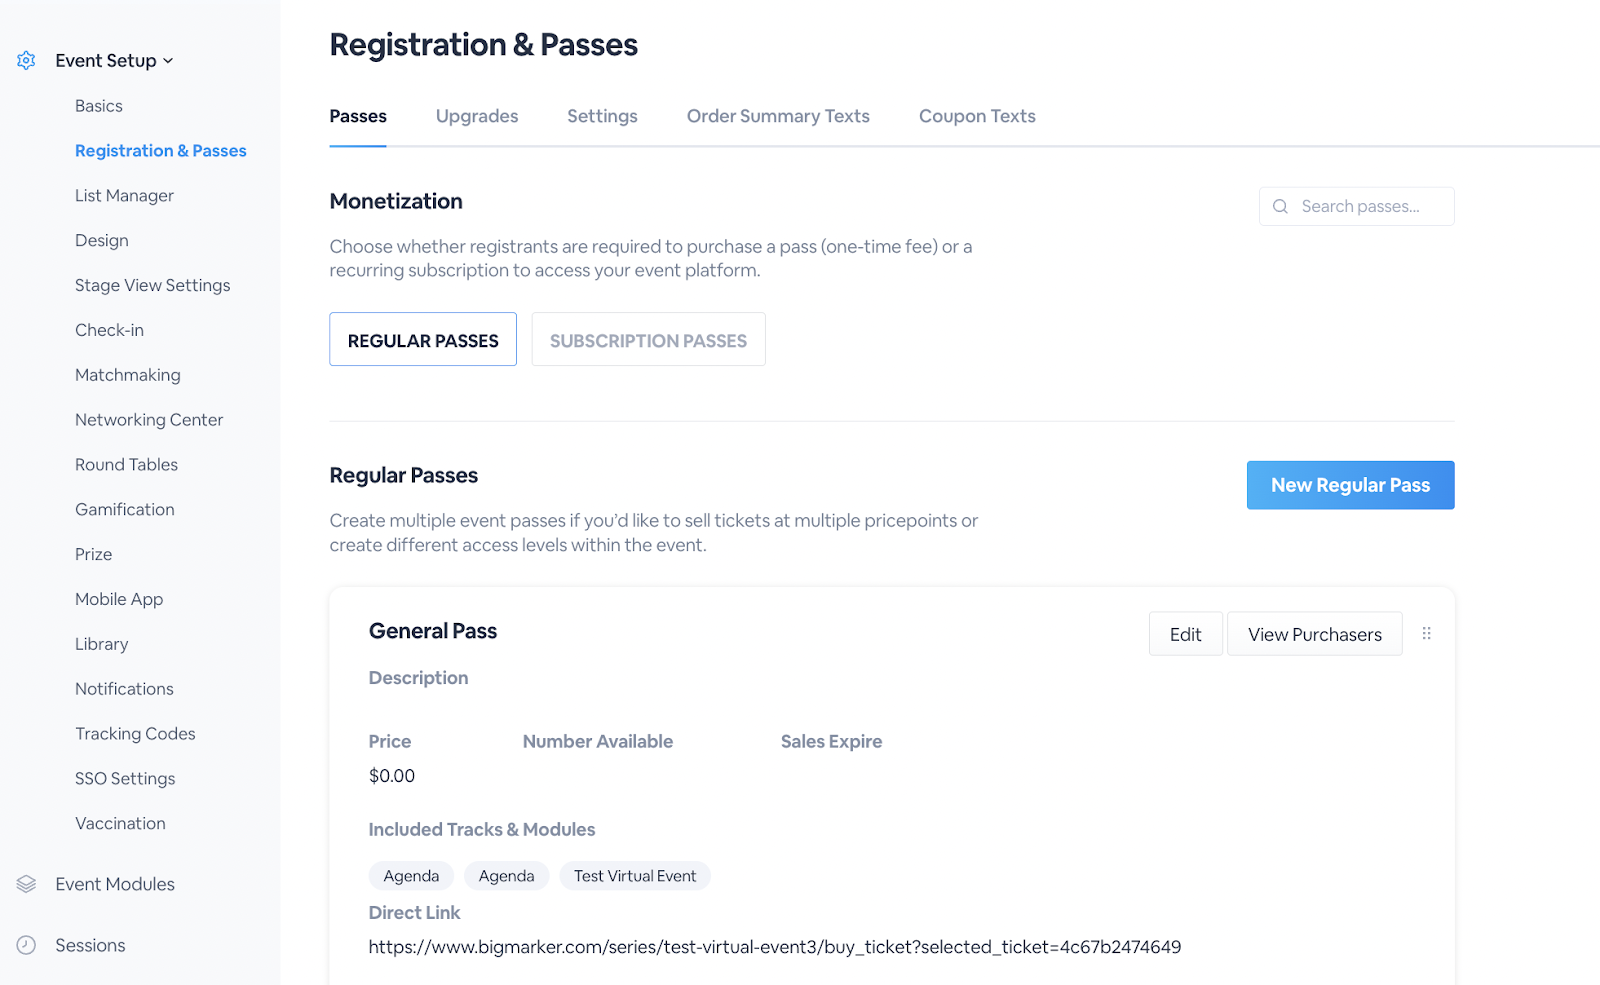
There are two types of passes to create:RegularandSubscription.Regular passes are one-time passes that can provide basic access to your event while Subscription passes are passes that attendees can purchase to subscribe to your event over a period of time.Both can have multiple types at different price points, giving your attendees options to choose from.
How to Create a Regular Pass
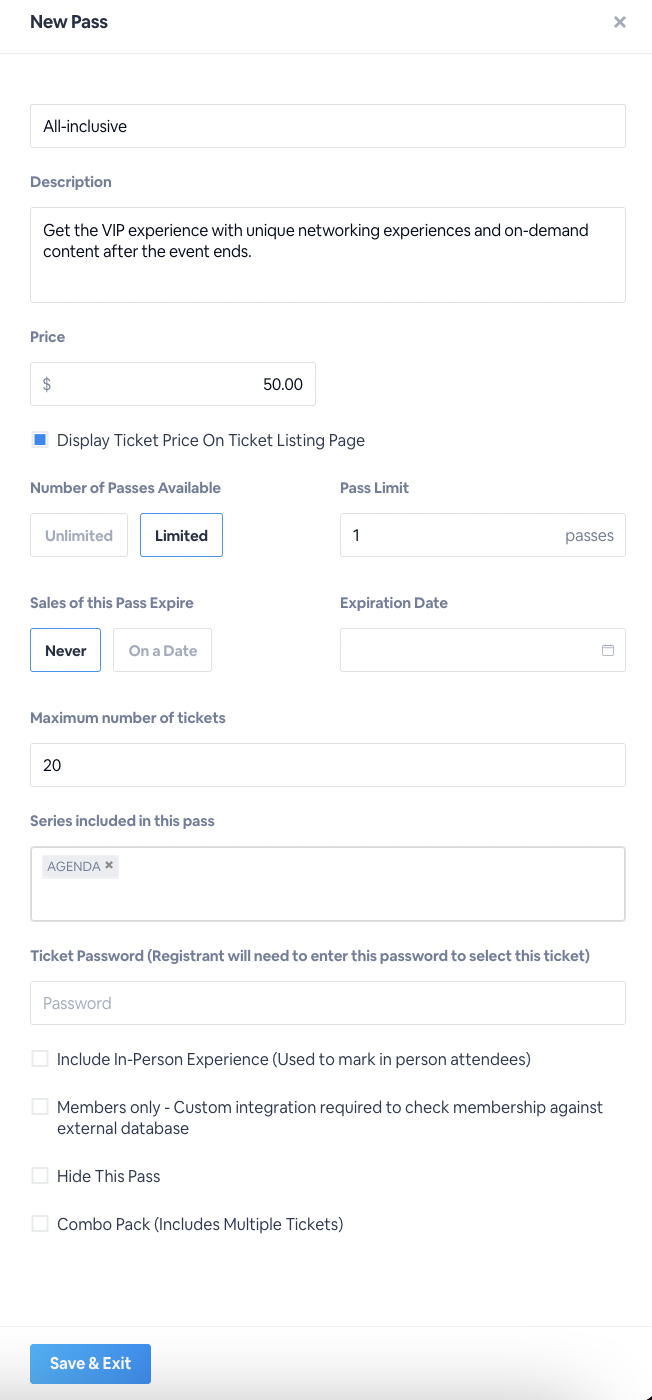
ClickNew Regular Passand in the right-hand drawer that appears, create your pass.Give it a name (i.e., "Early Bird," "All Access," etc.), description and price.In the prompts that follow, set your desired pass capacity and expiration date, if applicable.
For instance, if I were providing discounted All Access passes to the first 100 guests to register, I'd setNumber of Passes Availableto Limited, then enter 100 under Pass Limit.If I wanted sales for this pass to end on New Year's Eve 2020, regardless of how many passes were purchased, I'd setSales of this Pass Expireto On a Date, then enter the date under Expiration Date.
UnderSeries Included in this Pass, you can then set user permissions for passholders.When you click the box, a dropdown containing all of the BigMarker webinar series associated with your event modules (Expo Hall, Networking Center, etc.).
Additionally, you can give your pass a password (learn morehere), so that attendees who enter the password will be able to purchase the ticket.When finished, clickSave & Exit.
All of your passes will be below to view purchase history and edit.ClickEditto go back to the pass's settings to toggle andView Purchasersto see the name, date and email address of each purchaser.
How to Create a Subscription Pass
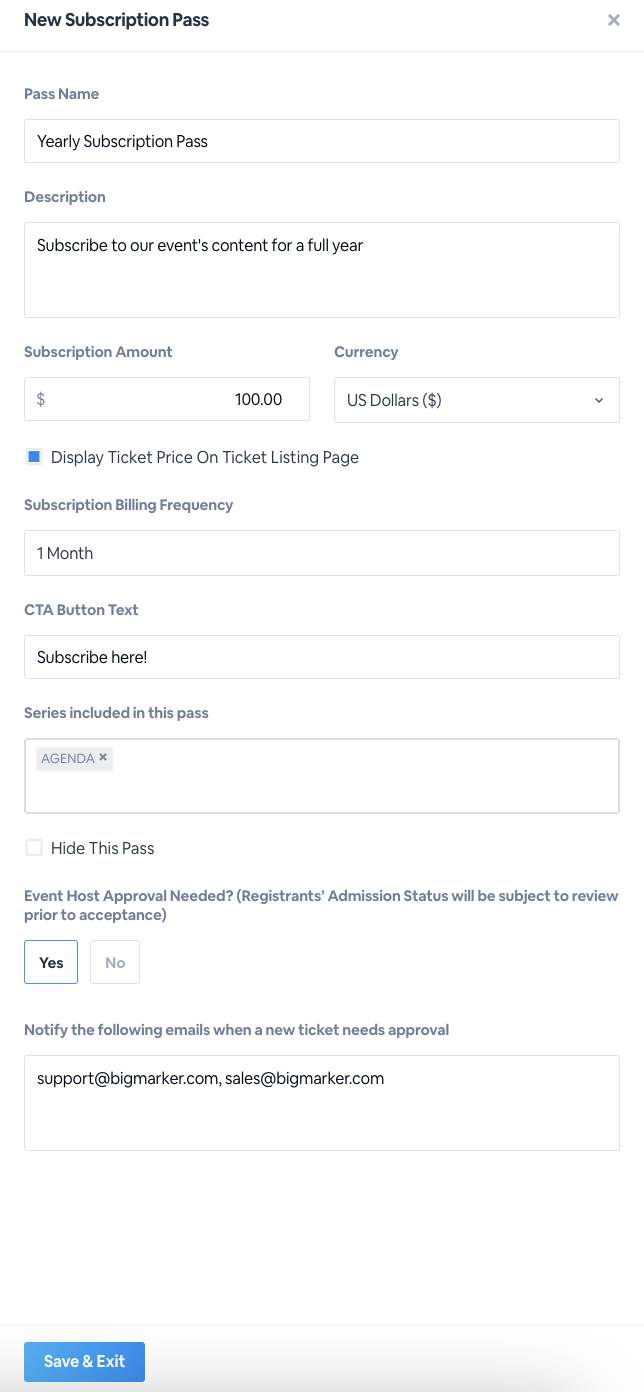
Switch over to theSubscription Passestab, and clickNew Subscription Pass.
Another right-hand drawer will appear where you can fill out the subscription's information.Enter in the subscription pass's name, description, price with currency, and billing frequency.
You can apply the same user permissions for passholders by associating the passes with a webinar series associated with your event modules using the dropdown underSeries Included in this Pass.
Lastly, mark if the subscription pass needsEvent Host Approvalby clicking yes or no, and if yes fill out the email addresses an email will need to be sent for pass approval.You can enter in as many email addresses as desired, using a comma to separate them.
How to Edit the Notifications for Subscription Passes
When creating a Subscription pass, attendees will get pop up notifications.These notifications will be for:Purchase Confirmation, Pending Approval, Subscription Updates, Subscription Expirations, Cancellation ConfirmationandCancellation Success.These are for each of the stages your attendees will go through when purchasing a Subscription pass.All of these can be found on theSettingstab towards the bottom.You can customize each notifications:
- Title
- Subtitle
- CTA text
Each has placeholder text that can be changed to feel more unique to your event.

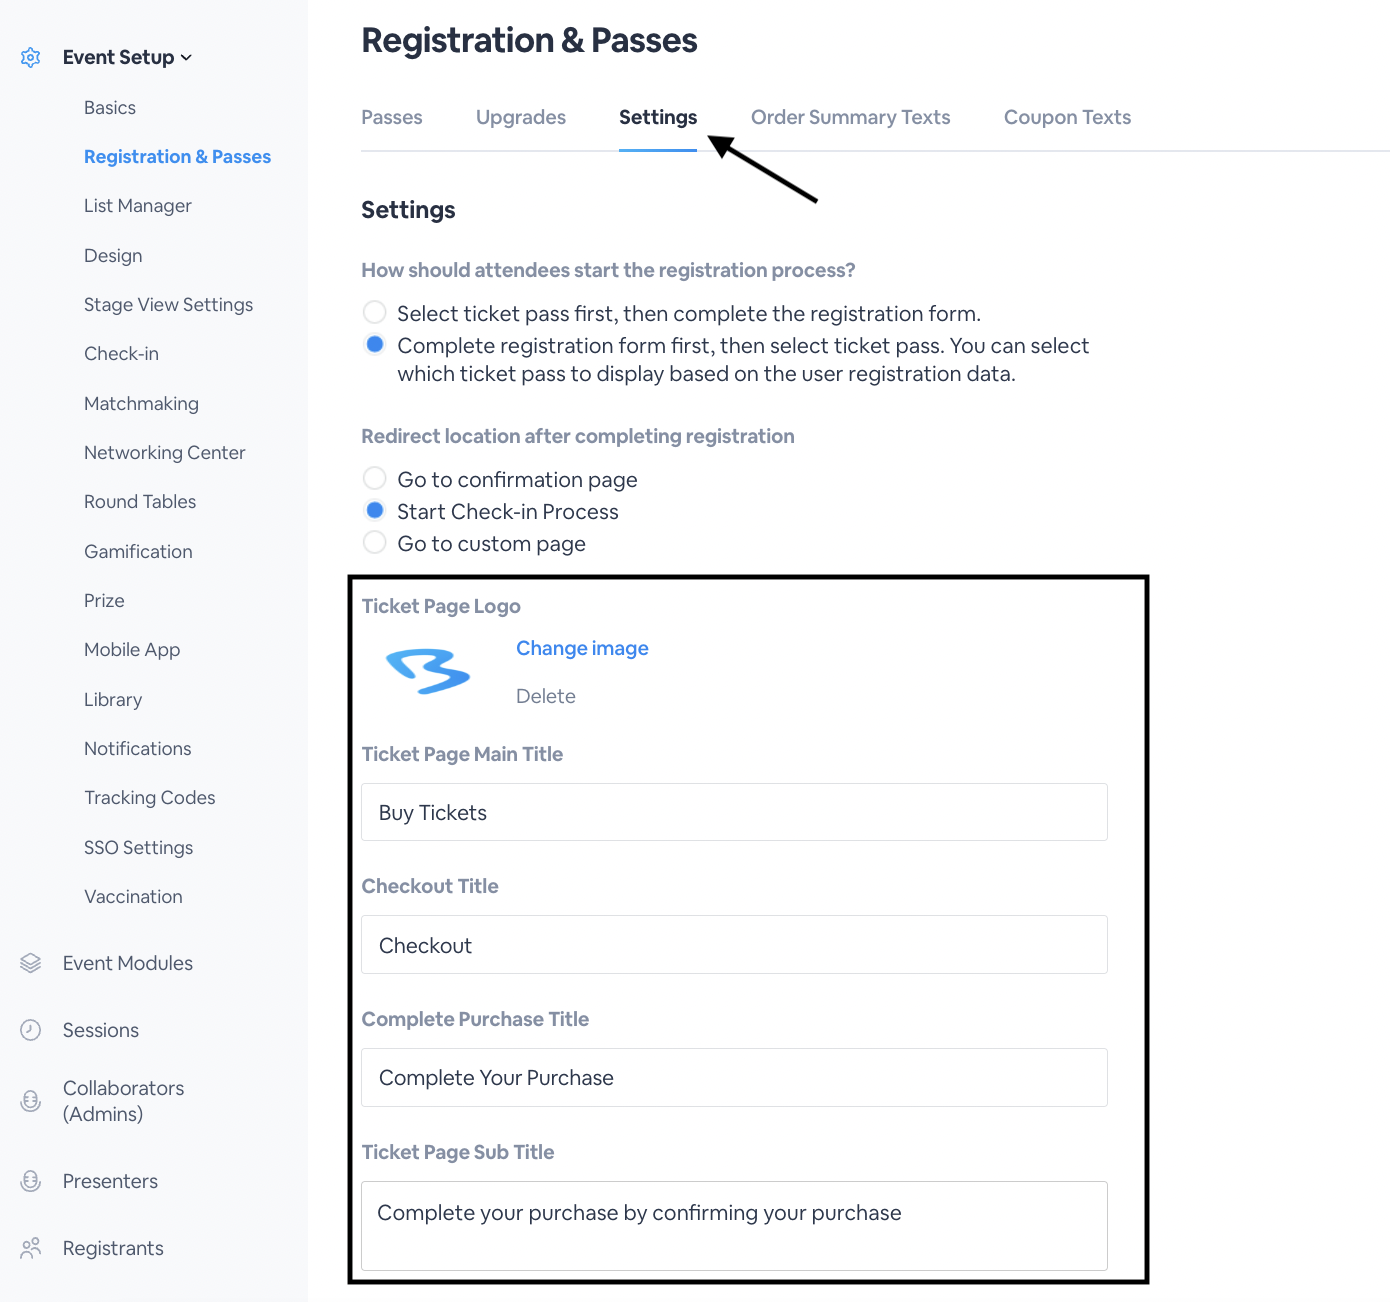
How to Design Subscription Passes
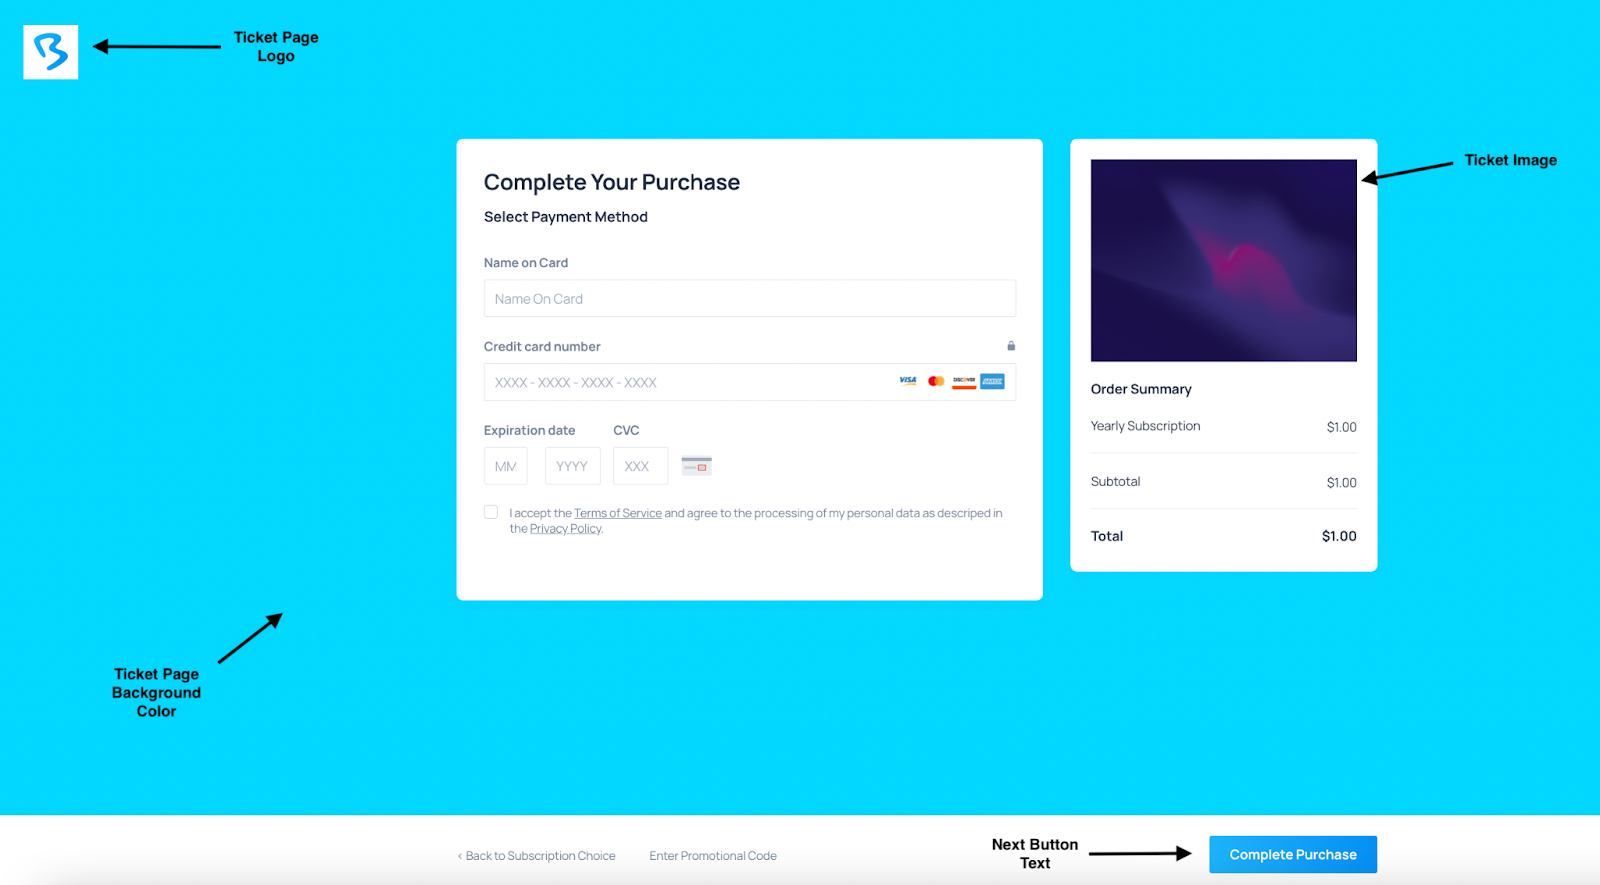
You can customize the look and feel of your passes when registrants are purchasing them.Any customizations made will apply to both regular and subscription passes.
Under theSettingstab, you can customize:
- Ticket Page Logo
- Ticket Page Main Title
- Checkout Title
- Complete Purchase Title
- Ticket Page Text Color
- Ticket page background color
- Ticket page background color gradient
- Ticket Image
- Top and Bottom Banner Image
- Bottom CTA Background Colors
- Bottom CTA Text Color
- Disclaimer Title
- Disclaimer Text
- Next Button Text
Here is an example of where the customizations are during the Registration purchase process:
To change the button colors, go to theDesignsection and under theColorstab, change them underPrimary buttoncolors.
Note:These colors are applicable throughout the entire event and will apply under all module buttons.

Setting up Allow Lists for Registration Passes
You can create certain passes to be available only to certain individuals on your own custom lists.This way, these individuals will have access to certain ticket passes while you will be able to target those individuals for marketing campaigns or further analytics while managing the accessibility for the pass
How to Set up a Registration Pass on the Allow List
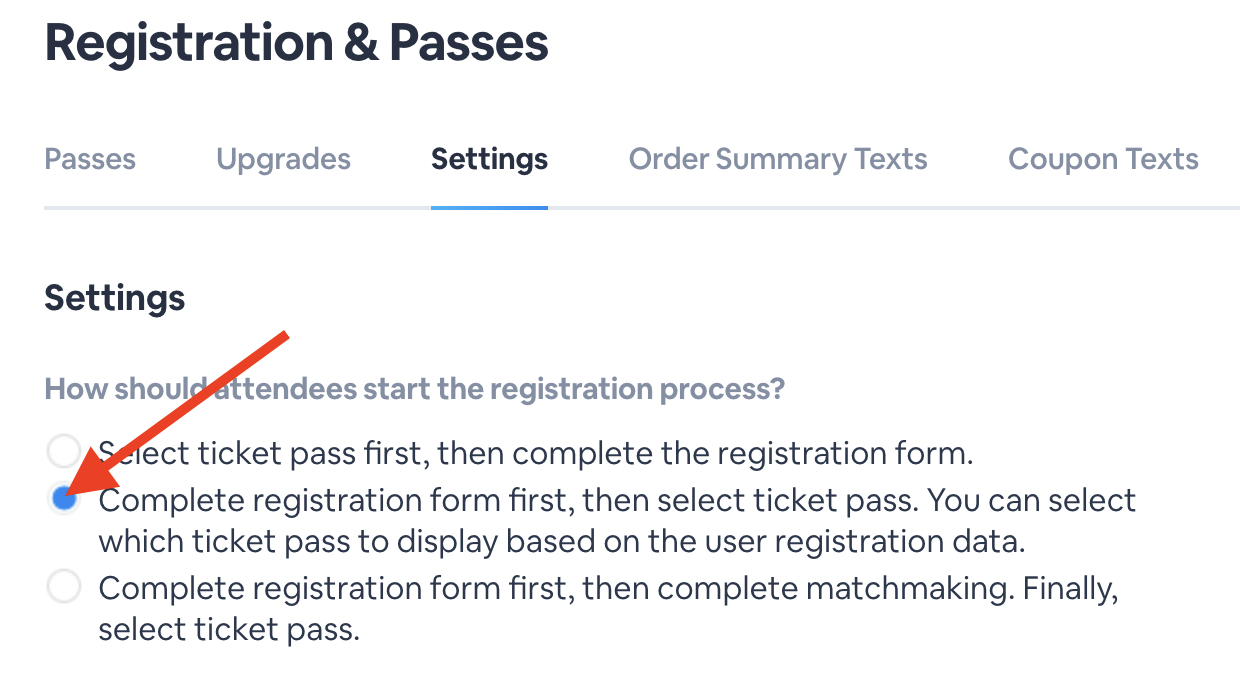
Note: You will need to have the complete registration form first setting enabled in order for the registration allow list to work correctly.
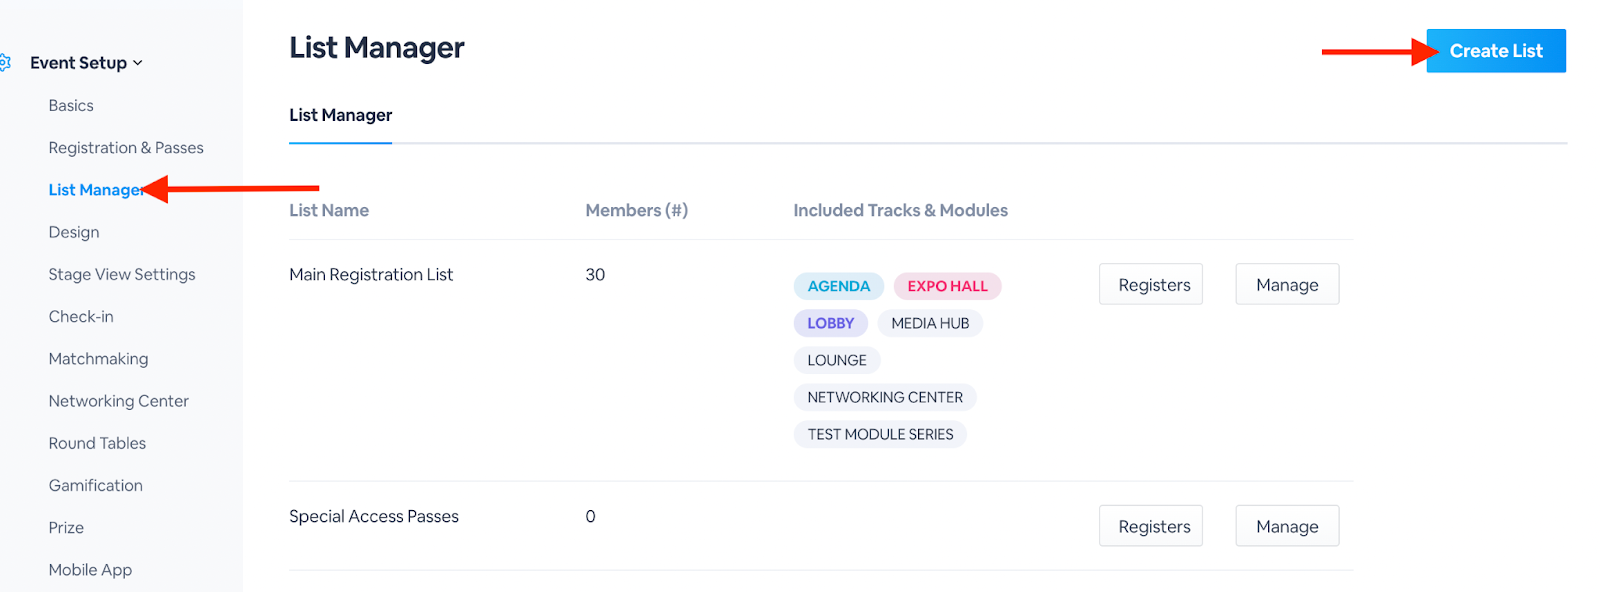
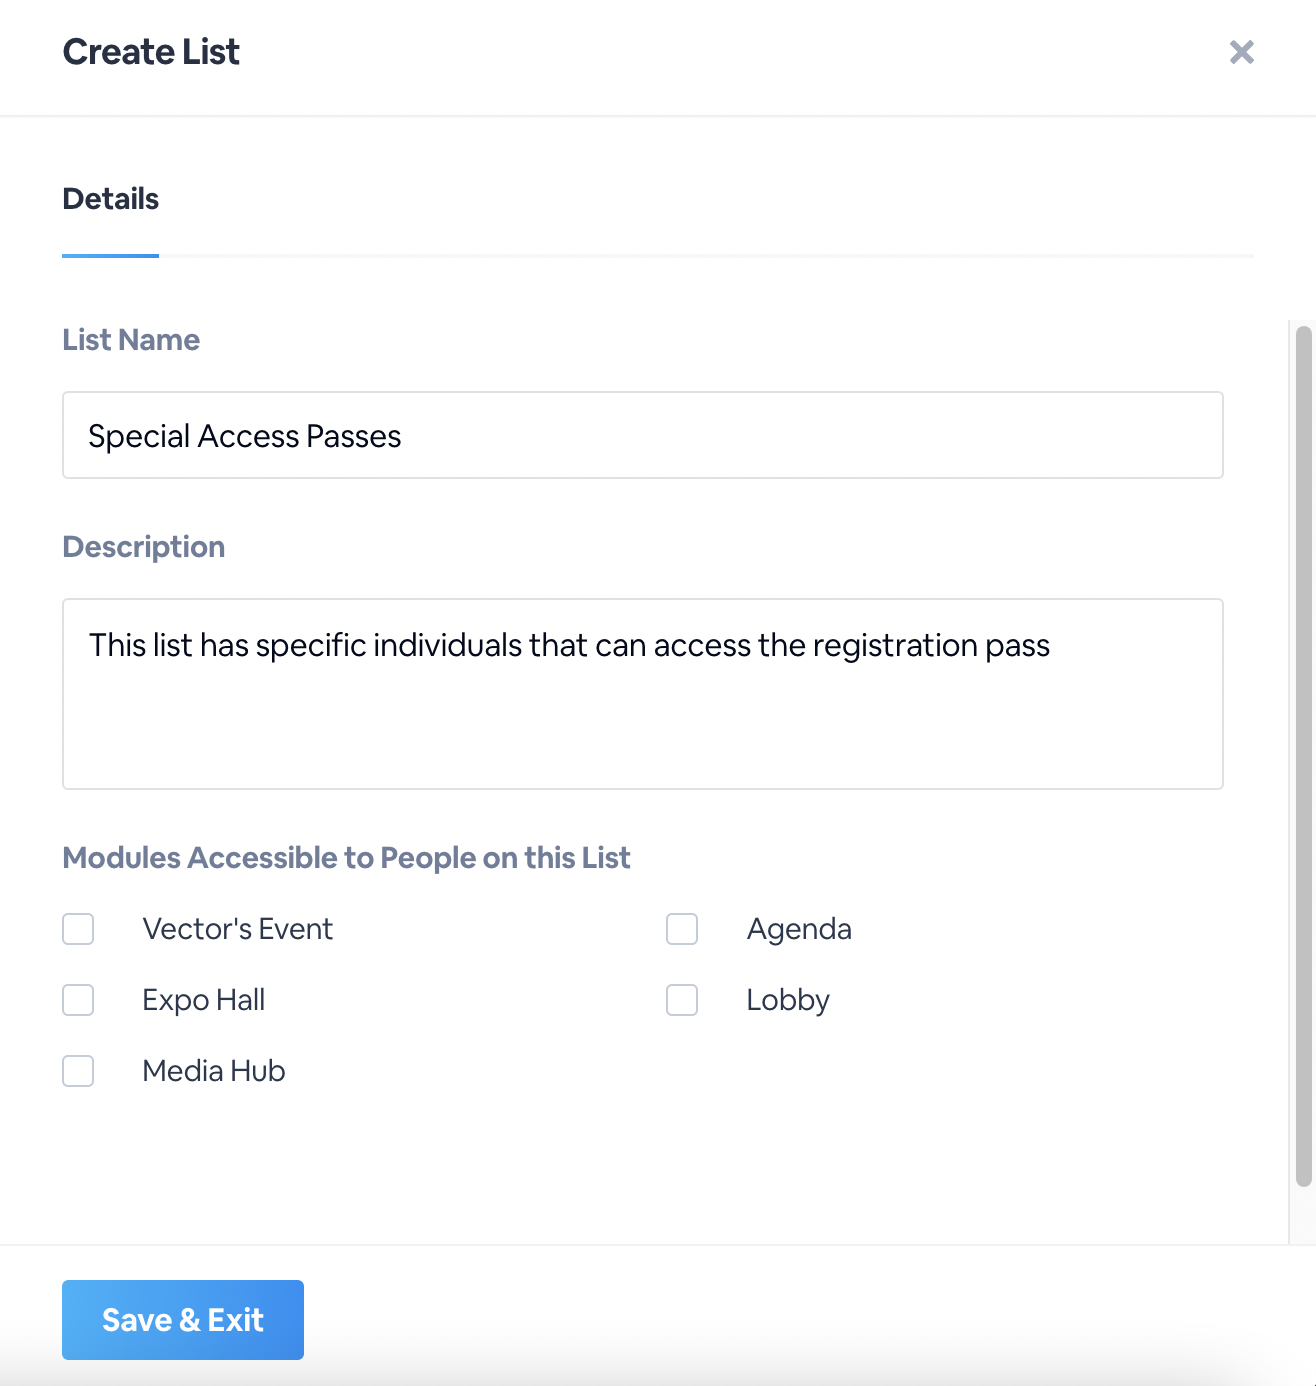
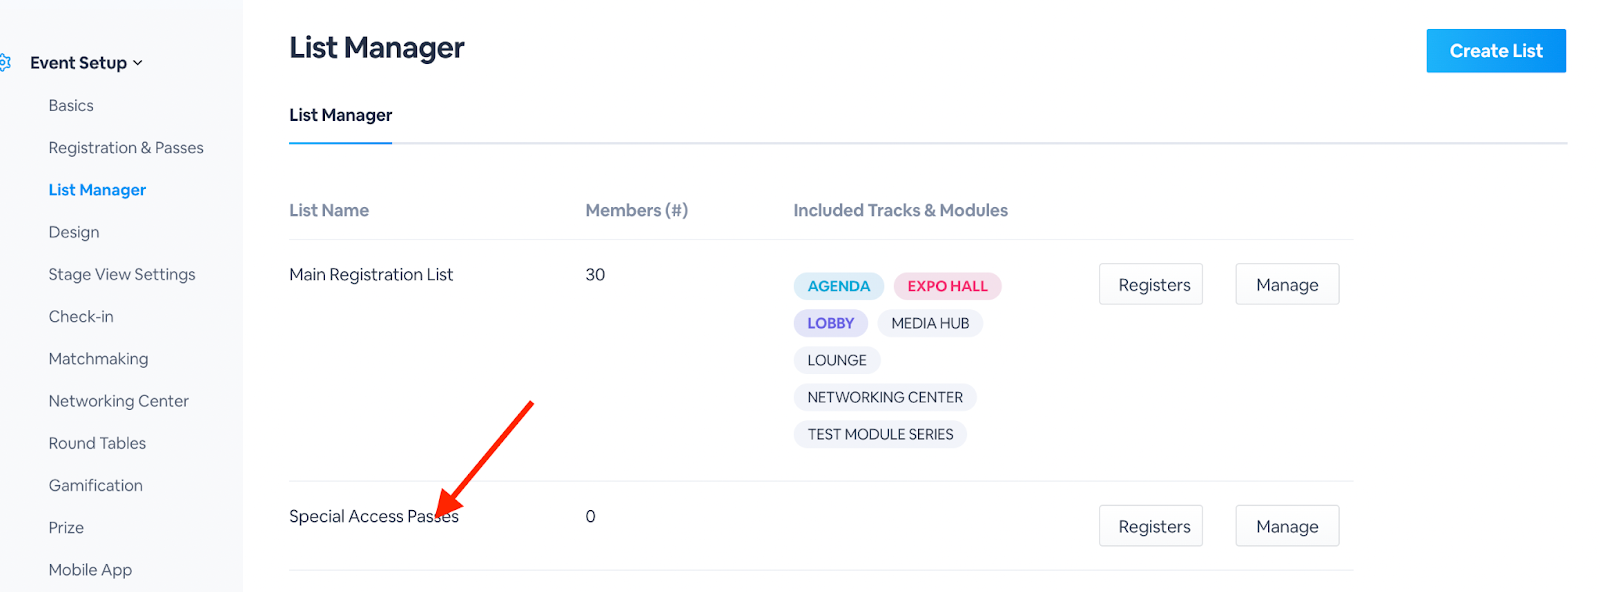
1.Go the theList Managertab in the left hand menu
2.ClickCreate List
3.Enter in the list's details, such as thelist title and description
4.Check off all the event modules for the list
5.ClickSave & Exit
Go back to theRegistration & Passessection.Either create a new registration pass (following the steps above) or clickEditon the desired pass.
6.Scroll down and check offPass only available to registrants from list
7.Select the lists allows to choose the ticket pass in the field below
8.ClickSave & Exit
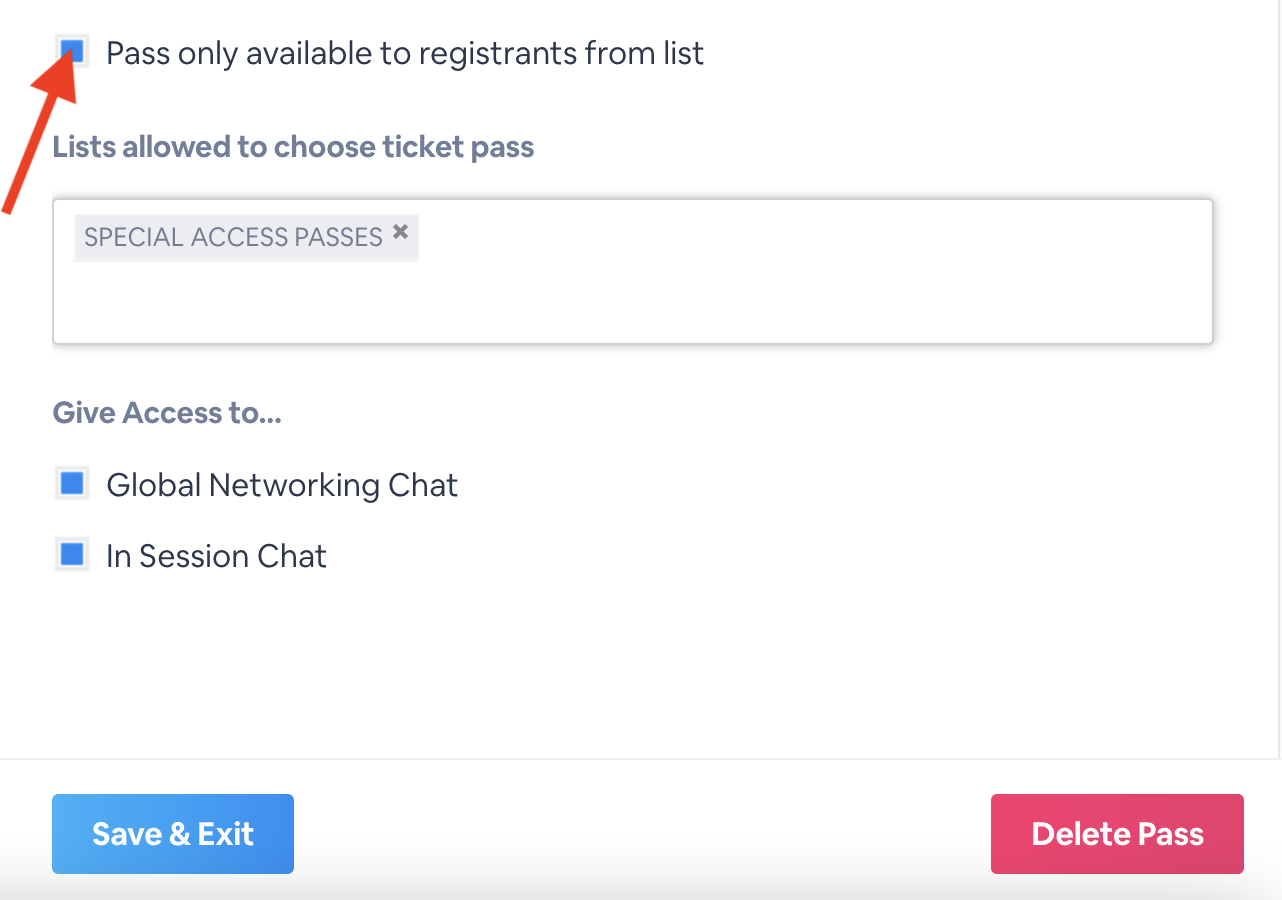
When checking in to your event, the registrants that have access to the ticket pass will be able to see it
How to Add Registrants to the List
Note: The lists in your List Manager are applicable across your entire Virtual Event.Use the lists you've created in any dropdown menu, granting access and permissions to registrants on the list easily.
2.Click on the List's title
3.ClickAdd Registrantsandadd the registrant's email address and first/last name
4.ClickSave
When those registrants enter their email address to the event, they will be able to see the specific ticket for the event.
Watch this below in live action:
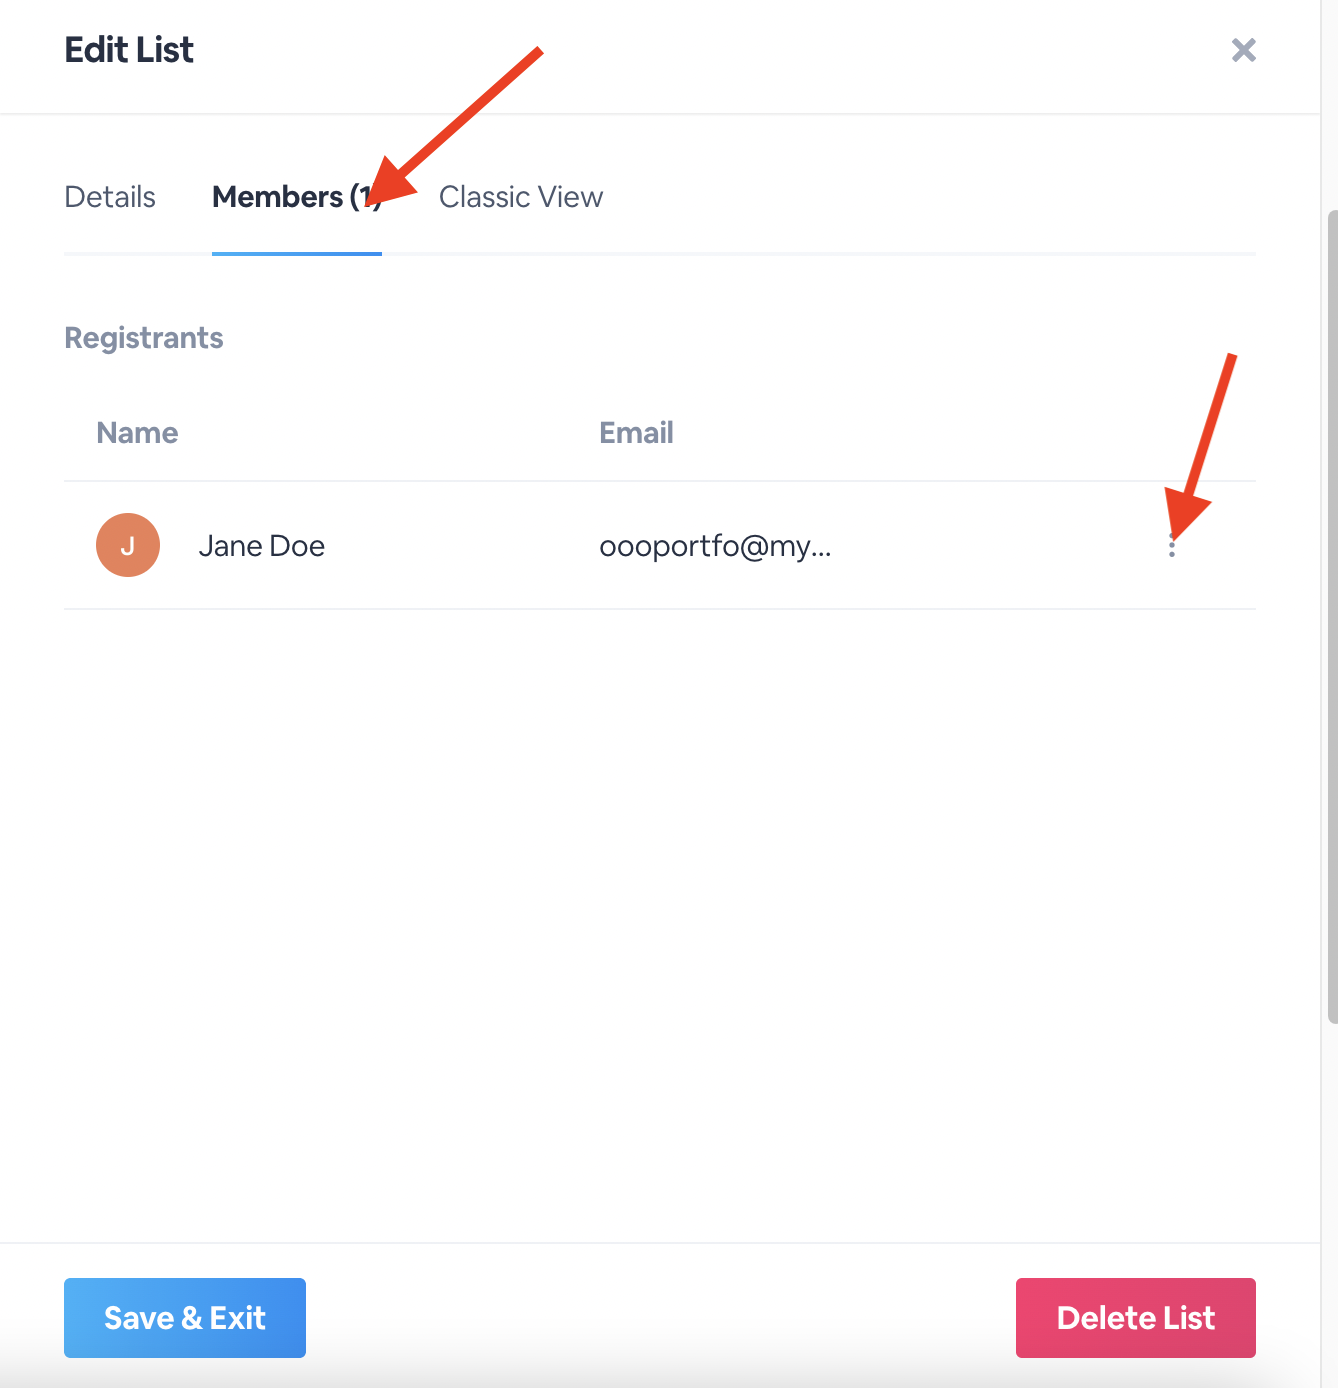
You can view all the registrants for the List by clickingManage, then going toMembers.Click thethree dotsto remove them, or you can clickClassic Viewto head to the backend of the List to manage and add more registrants to the list.