Our Companion App, where attendees can view your event's agenda, network with other attendees, check in to sessions and expo booths and more.
Note:This feature is only available for Virtual Events and Enterprise plan holders.Please contact our Sales team at Sales@bigmarker.com to learn more.
New as of 4/16/2024:Customize One-Time Password email
Registrants and attendees need to receive and then input aone time passwordin order to log in to the app.Previously, that email was one that was sent from BigMarker and could not be customized.
Now, you can customize that email just like any other.This is only for events that use the app.

For Hybrid Events, we have apps your attendees can download on their mobile devices to accompany them throughout your event.The main app is our Companion App, where attendees can view your event's agenda, network with other attendees, check in to sessions and expo booths and more.
Below, learn more about how to set up your Companion App for attendees to download and how to customize the interface to make the design an extension from your event.
First things first, your attendeesmust be registeredto your eventbeforebeing able to access your Companion App.Once they are registered, they can then proceed to download the app from the App Store or Google Play and then log in using their registration credentials and establish a password.
Table of Contents:
- How to Set Up your Companion App
- Designing the Launch Screen
- Designing the Login Screen
- Setting up the Check In
- Setting up the Virtual Event Badge
- Designing the Virtual Event Badge
- Designing your Homepage
- Setting up the Agenda
- Setting up Sessions
- Setting up RTMP
- Setting up Surveys
- Setting up the Networking Center
- Setting up the Expo Hall
- Applying a search filter to the Networking Center
How to Set Up your Companion App
1.On your Main Series, clickManage Event

2.On the Virtual Events backend, click toMobile Appon the left hand side
3.Enable on theMobile App Ontoggle
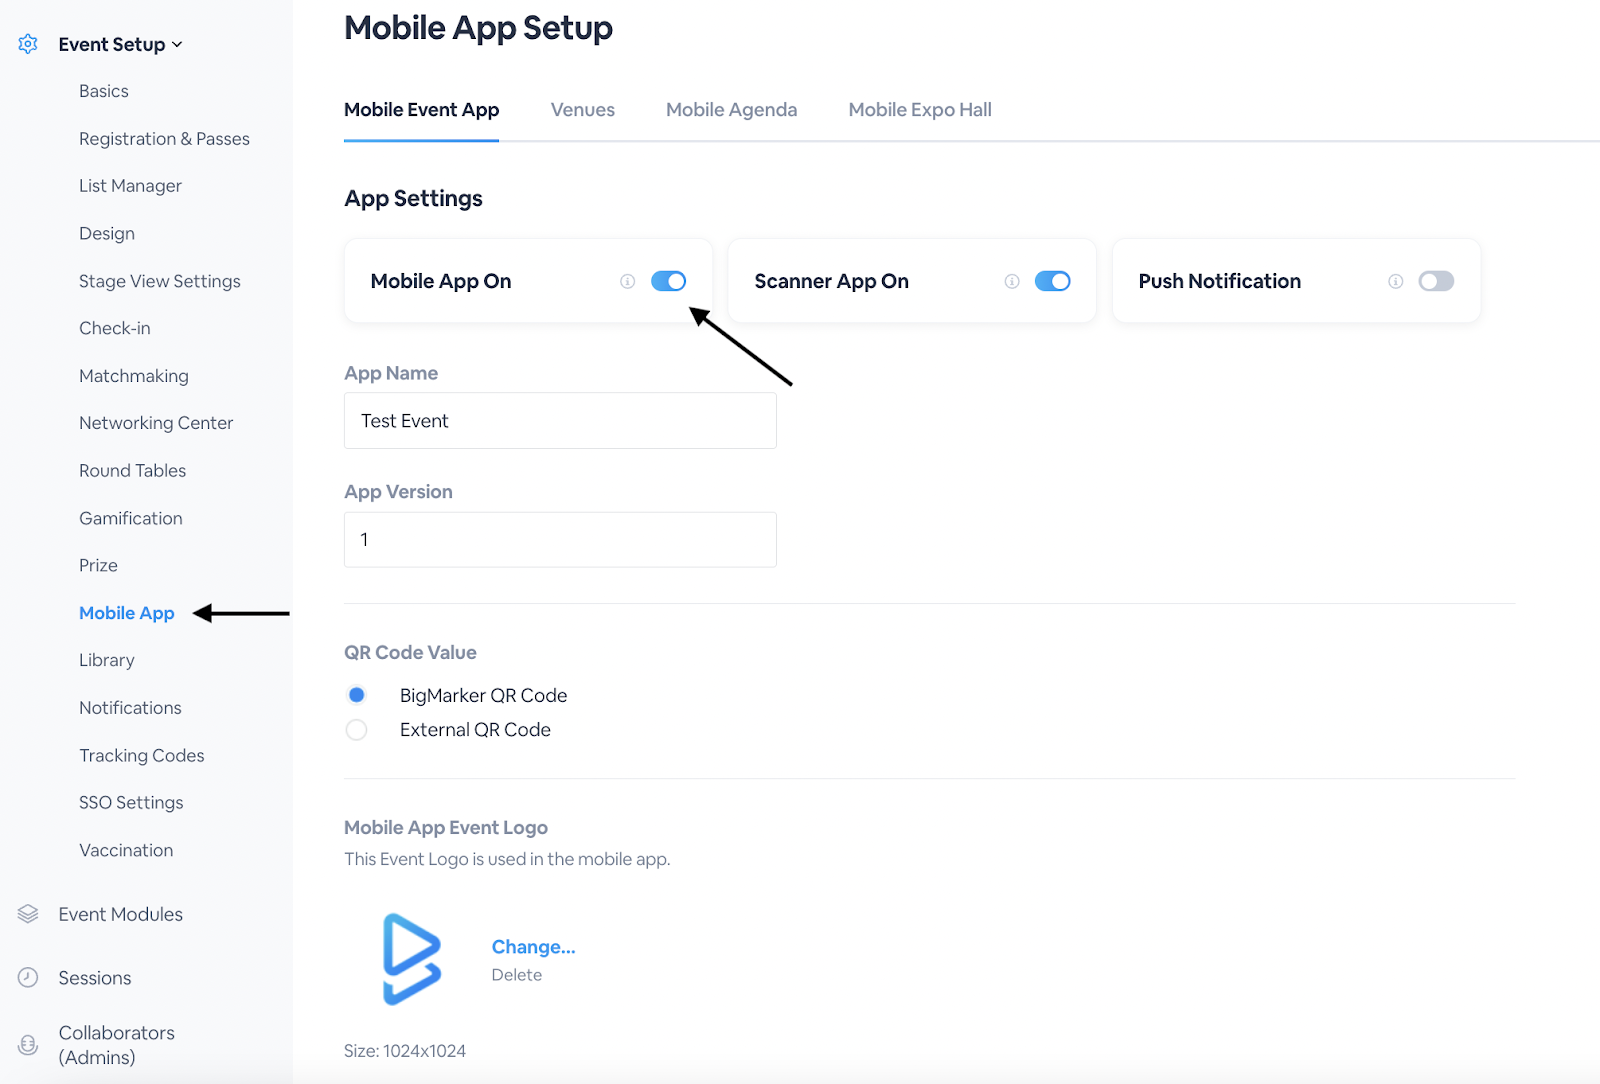
After that has been enabled on, you will see the design components that can be customized.
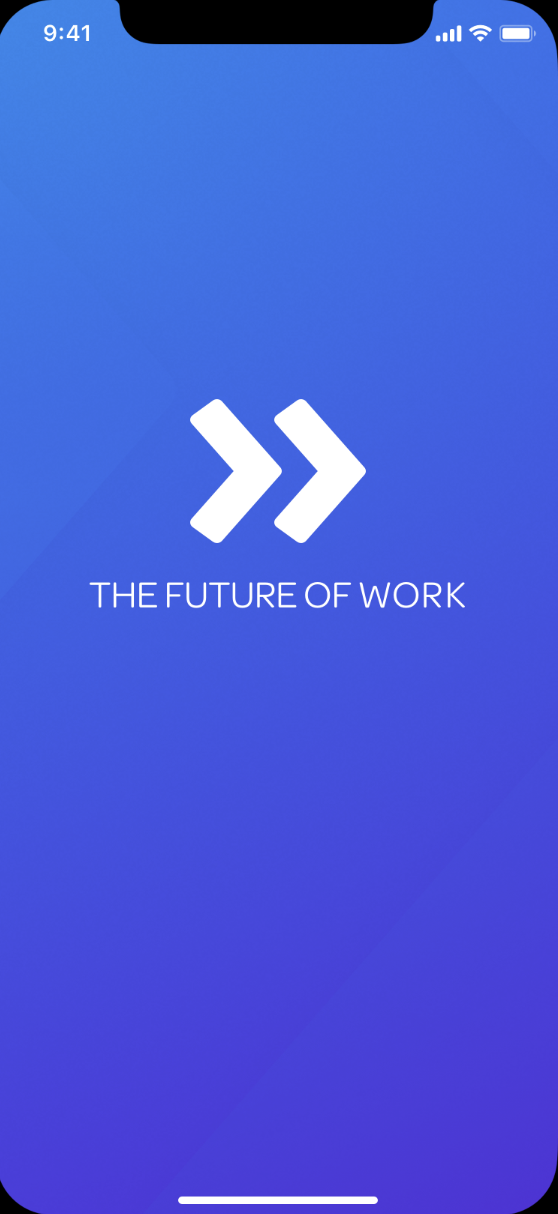
Designing the Launch Screen for the Companion App
If you desire an image to be included when attendees or registrants are opening up your app, we can hardcode an image of choice for you.The image will need to be provided to your BigMarker event team, with the following specifications:
- iOS: 1242 x 2688, 1242 x 2208, 2732 x 2048
- Android: 1024 x 500
An example of a hard coded image in the Companion App Launch Screen:
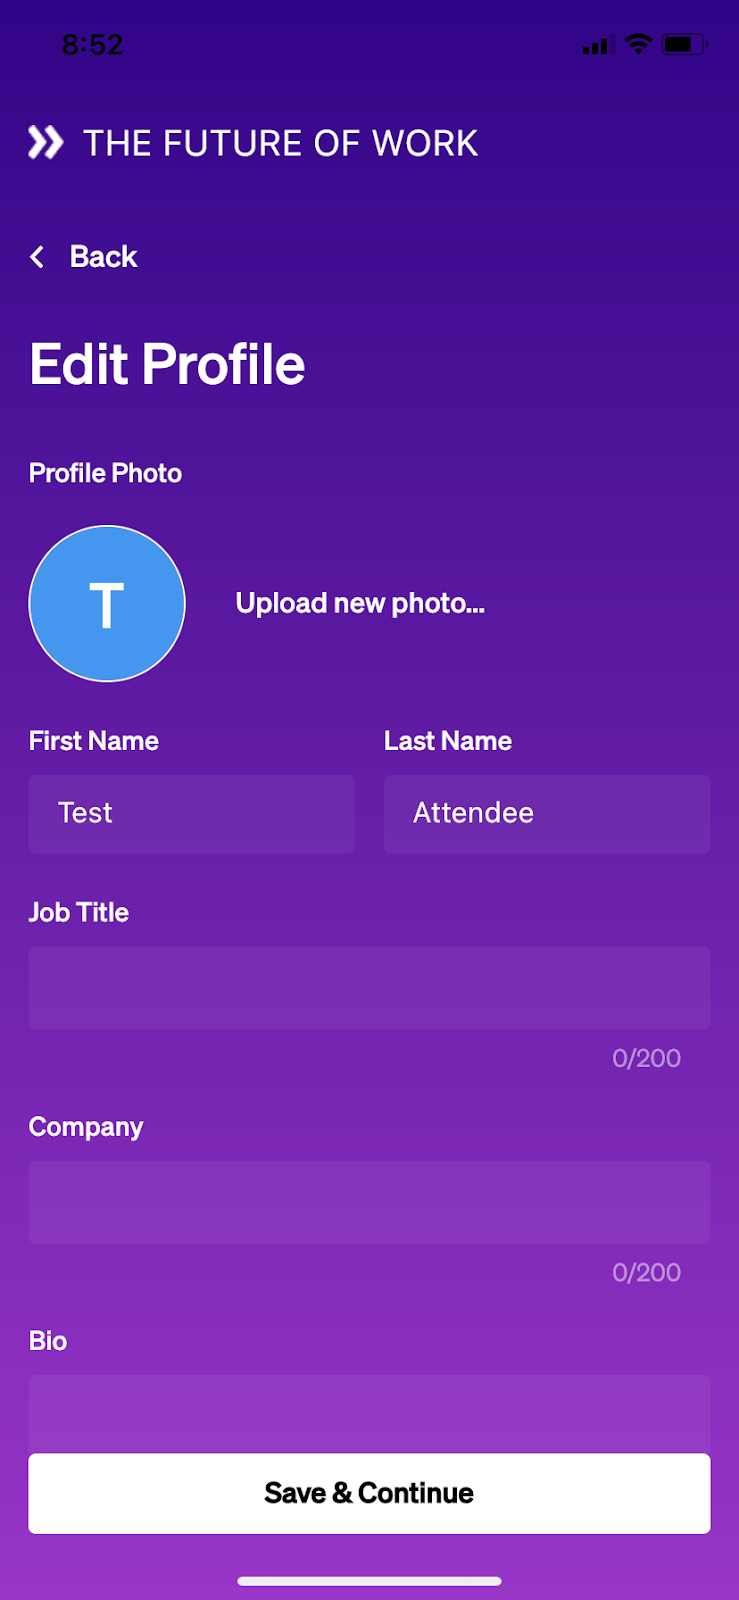
Designing the Login Screen
1.Name the app in theApp Nametext box.
2.Upload an event logo image into theMobile App Event Logobox.We recommend these images be in sizes 1024x1024

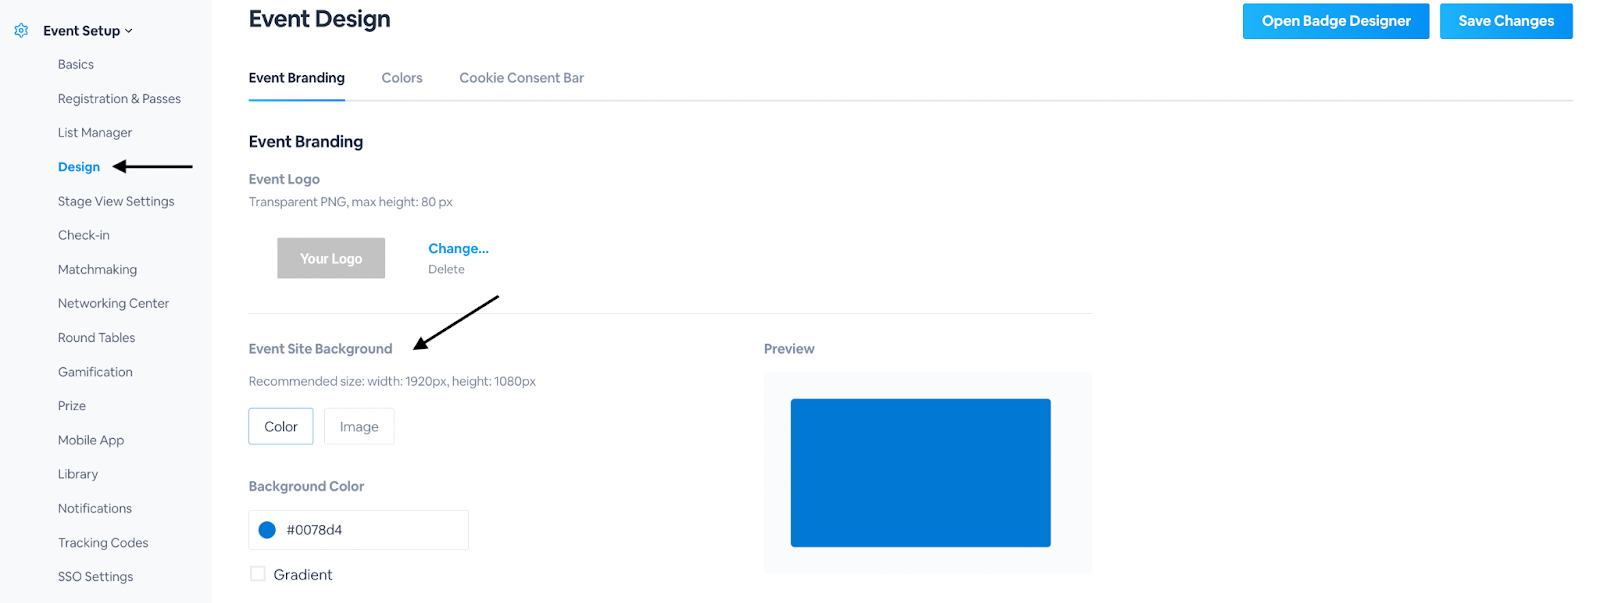
3.Go to theDesignsection and customize the background color of the launch screen underEvent Site Background
These will encompass the design for the login screen of your App.Below is an example of a login screen:

Note:Attendees will receive a one time password (OTP) to the email they are using to register with that will contain a code needed to enter before proceeding with Check In.
Setting up the Check-In
You can customize the Check In for your virtual event, from the design components to the virtual business cards and event badges.
First things first, you will want to enable Check In on for your virtual event.You can do this under theEvent Modulessection and toggling onVirtual Check-In

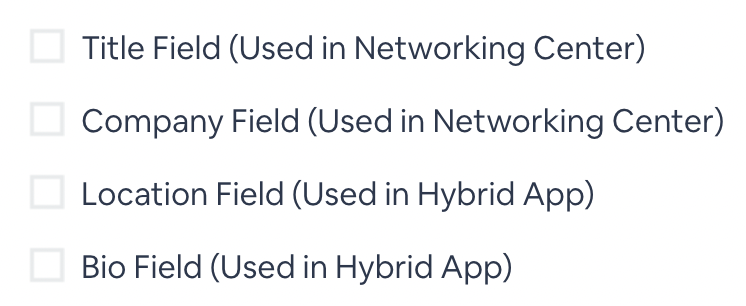
For the Custom Registration Fields, you can set these up from the Main Series's Custom Registration Fields (learn morehere).We do recommend ensuring these custom registration fields are in your app's Check In:
- Title
- Company
- Location
- Bio
Additionally, make sure to check offShow Question and Response in Business Card (used in the Networking Center)to show their responses on their event badges.

Lastly, if you are using ourBadge Scanner Appand having attendees check in onsite, make sure you check offShow field in Printed Badgefor the custom registration field to show up on the Event iPad for them to review and confirm their information.This field's answer will show on the attendee's event badge when checked off.

If you'd like your attendees to add their Social Media profiles and and share them with other attendees on their Virtual Event Badge, go to your event's backend and head to theCheck-Insection.From there, clickCustomizeonPreferences. Toggle theAsk forsetting on for any social media platform you'd like to be showcased on your attendee's virtual event badge, such as LinkedIn, Twitter, Instagram and more.

If an attendee inserts their social media profile it will display on their virtual badge for all attendees, no connection request needed.The icons for the respective social media will populate on an attendee's badge, which will redirect the attendee to that specific platform for instant connections.This promotes networking both during and after the event for your entire audience.
After your custom registration fields are set, and your check in is enabled, proceed toDesignonce more to begin designing your virtual event event badges
Setting Up the Virtual Event Badge
1.Go to theCheck-Insection on the left hand side, then clickCustomizeonYour Event Badge

- Check In Main Title
- Check In Sub Title
- Check In Badge Background

3.Click Save Changes
Designing the Virtual Event Badge
1.Go to theDesignsection and clickOpen Badge DesignerunderVirtual Event Badge
2.Customize the design of the Virtual Event Badge, including:
- Cover Photo
- Connect Button Text
- Connect Button Text Color
- Button Color
3.ClickSave Changes.
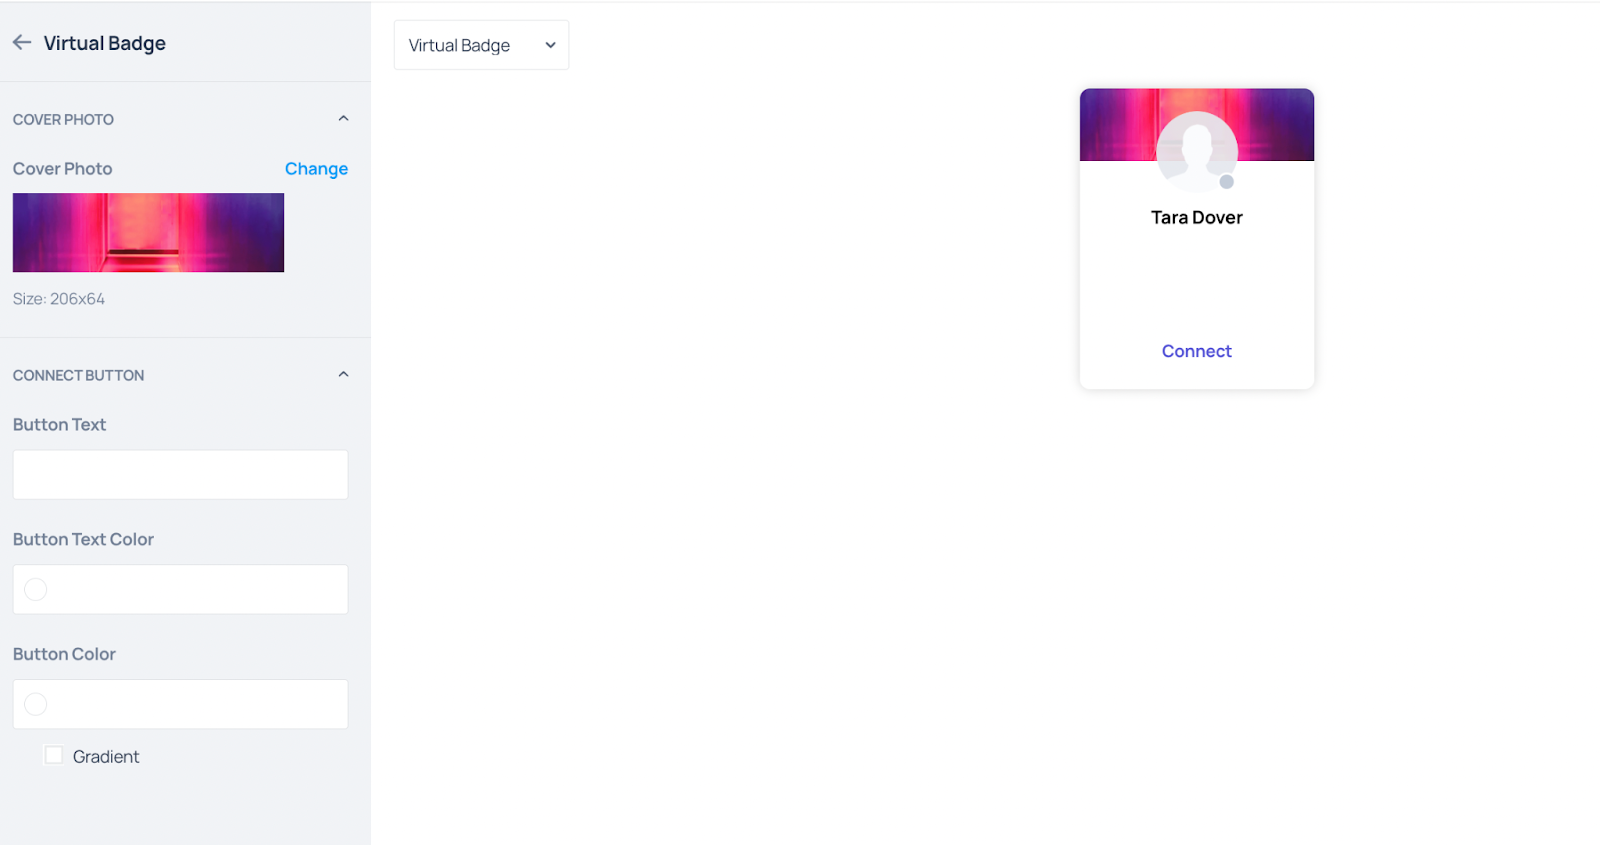
This will be the virtual event badge attendees will see and use to connect with other attendees and check into events.
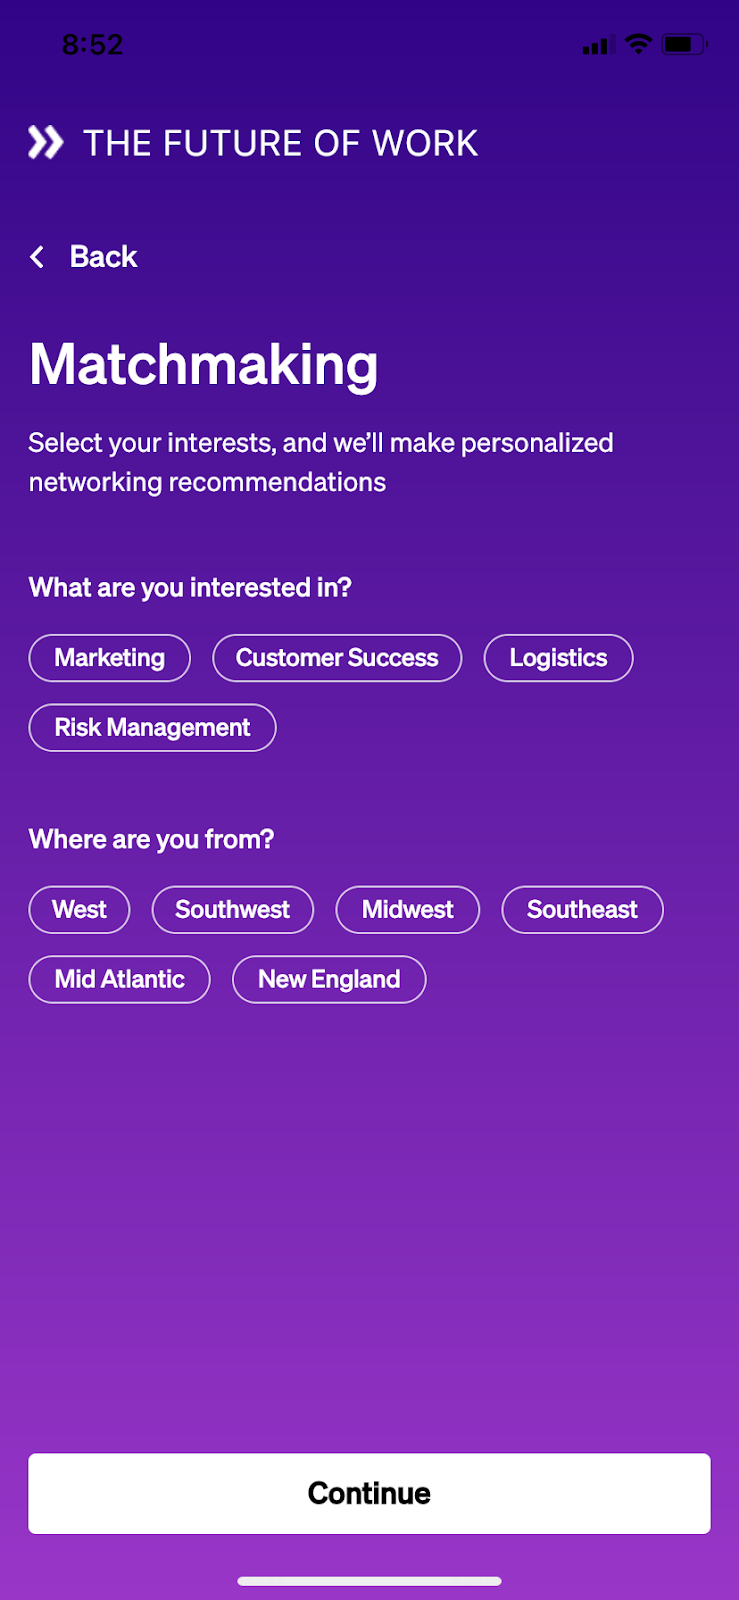
Go back to the Check In section, and enable onMatchmakingif matchmaking is desired (ClickCustomizeto customize the matchmaking designs and theMatchmakingsection to add categories of interests attendees can select).
Note:The background color will remain consistent with the check in and log in screens.If you would like to customize this, you can do so on theDesignsection underEvent Site Background.

After that, the customizations for the Check in are complete.You can opt for a Welcome Video and the QR code will be hard coded into the app.We do recommend creating a video of your own welcoming your attendees to the app and showing them how to use it.
Note:The Welcome Video must be hard coded into the app.To do so, please contact your BigMarker Representative to initiate this process with our Development team.
Here are examples of the CheckIn screens on the app:
- Event Badge 2.Edit Badge 3.Matchmaking 4.QR Code


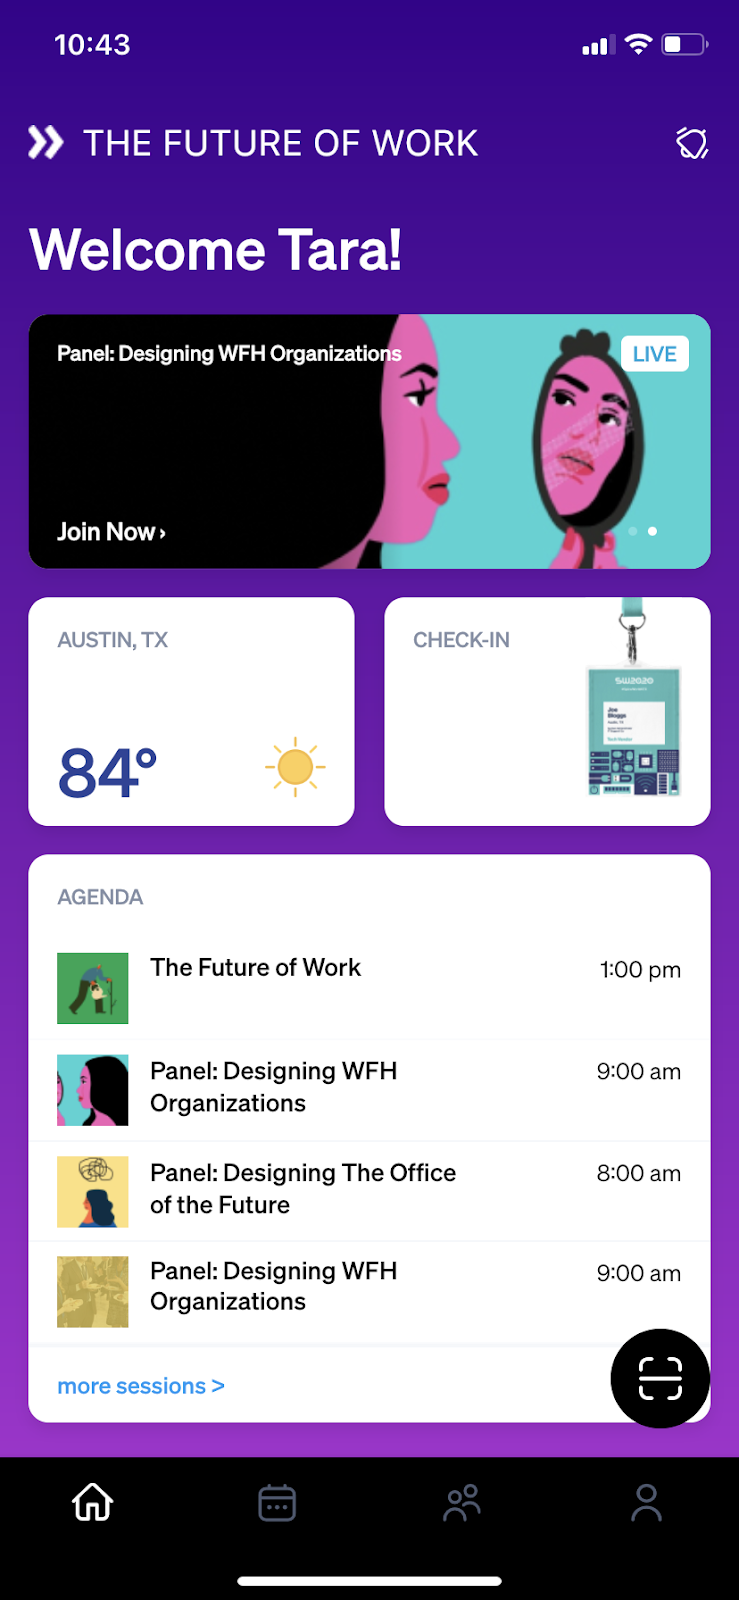
After the Check-in, proceed to customize the Homepage for your Companion App.This will be where attendees see your agenda, sessions, location and more.
Designing your Homepage
There are hard coded widgets on the home page that will look and function the same way across all companion apps.The hard coded components are:
- Happening Now Nudges
- Check In Widget
- Agenda Widget
- Connection Request Widgets
You can customize the tile, logo and background color of the homepage.To do so, go to theMobile Appsection and adjust theApp NameandMobile App Event Logo Image.For the Background Color, you can adjust on theDesignsection underEvent Site Background Color


Note:The app title, event logo image and background color are consistent across the login and check-in process and homepage.
Here is an example of a Companion App Homepage:
Setting up the Agenda
The agenda is one of the most important aspects of your Companion App, so it is important that it is set up correctly.
1.Go to theEvent Modulessection on the left hand side and enable on theAgendamodule.

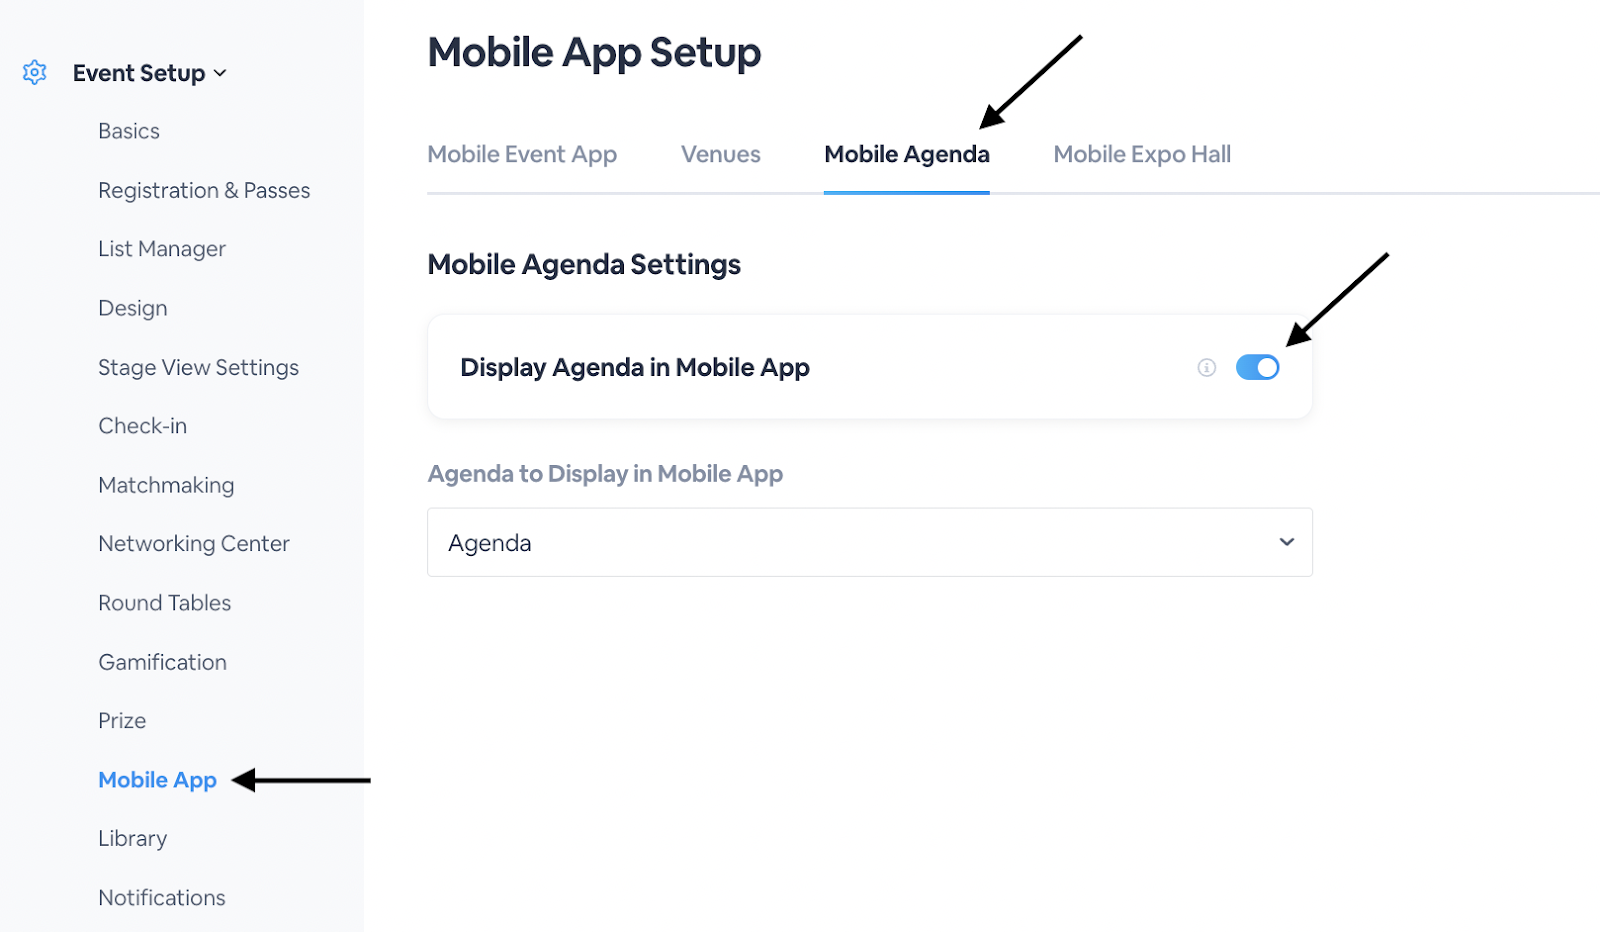
2.From there, go to theMobile Appsection on the left hand side and click to theMobile Agendatab.
3.Enable onDisplay Agenda in Mobile Appand use the dropdown menu below to select the Agenda to use.
You can opt to have the Agendadisplay only those sessions aligned with attendee's answers to your custom registration fields.To do this, check offOnly show the agendas for those registered for the attached webinar.

A few key components to consider when setting up your Agenda:
- Time Zones can only be "time only" or "24 hour clock format"
- Happening Now Nudges show all the live sessions and are set with the Agenda series selected
- You can add Agenda Dates and Favorite Hearts to the Companion App
- The filters are taken from "agenda dates" and the categories will be set with those sessions associated.
- If you'd like to limit access of attendees to sessions they only registered in the app, enableonly show agenda for those that registered for attached webinar.That way only attendees who registered for sessions will see them on their agenda as well as attend them.
Here is an example of an Agenda on a Companion App:
Setting up Sessions
1.Go to Sessionson the left hand side and then click Add Session
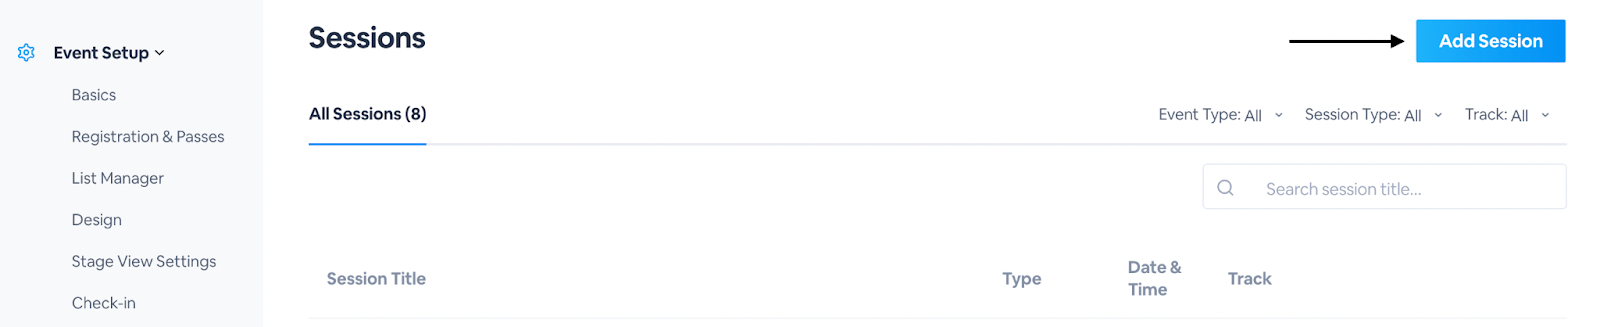
2.When creating a session, fill out:
- Session Name
-
- Event Type- Hybrid or In-Person
- For Hybrid - you will have the option to stream the session in the App or Browser
- For In-Person - there will be no live webinars available in the App or on a Browser
- Room List- add these from the Venue added under the Mobile Section
- Session- Live or On-Demand
- Copy from Template- create the session based on a saved template
- For Hybrid - you will have the option to stream the session in the App or Browser
- Event Type- Hybrid or In-Person
- Description

4.Click Save & Exit
From there you will want to add your Presenters to your sessions.After saving the session, clickManageto go to the session's settings.Once there, on the top click thePresenterstab and then clickAdvanced Settings.
You will be able to add the Presenters into the session as you would for other events.Clickhereto learn more.
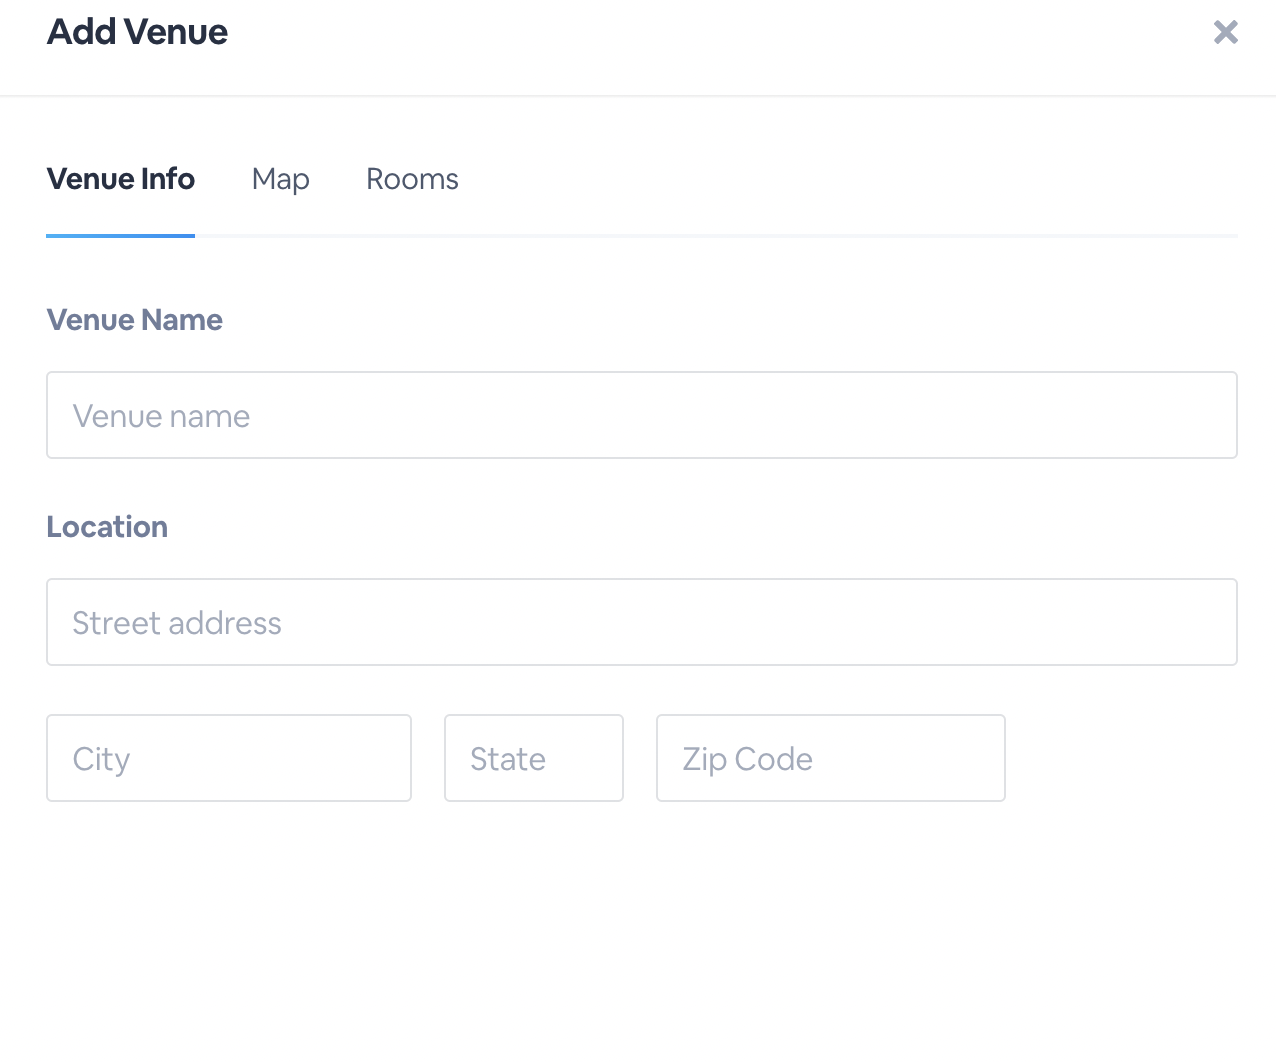
Next, add locations to your sessions.Go to theMobile Appsection once more and click toVenue.
1.Click Add Venue
2.Enter in the Venue Info:
-
- Address
- City
- State
- Zip Code
- Venue Name
- Location
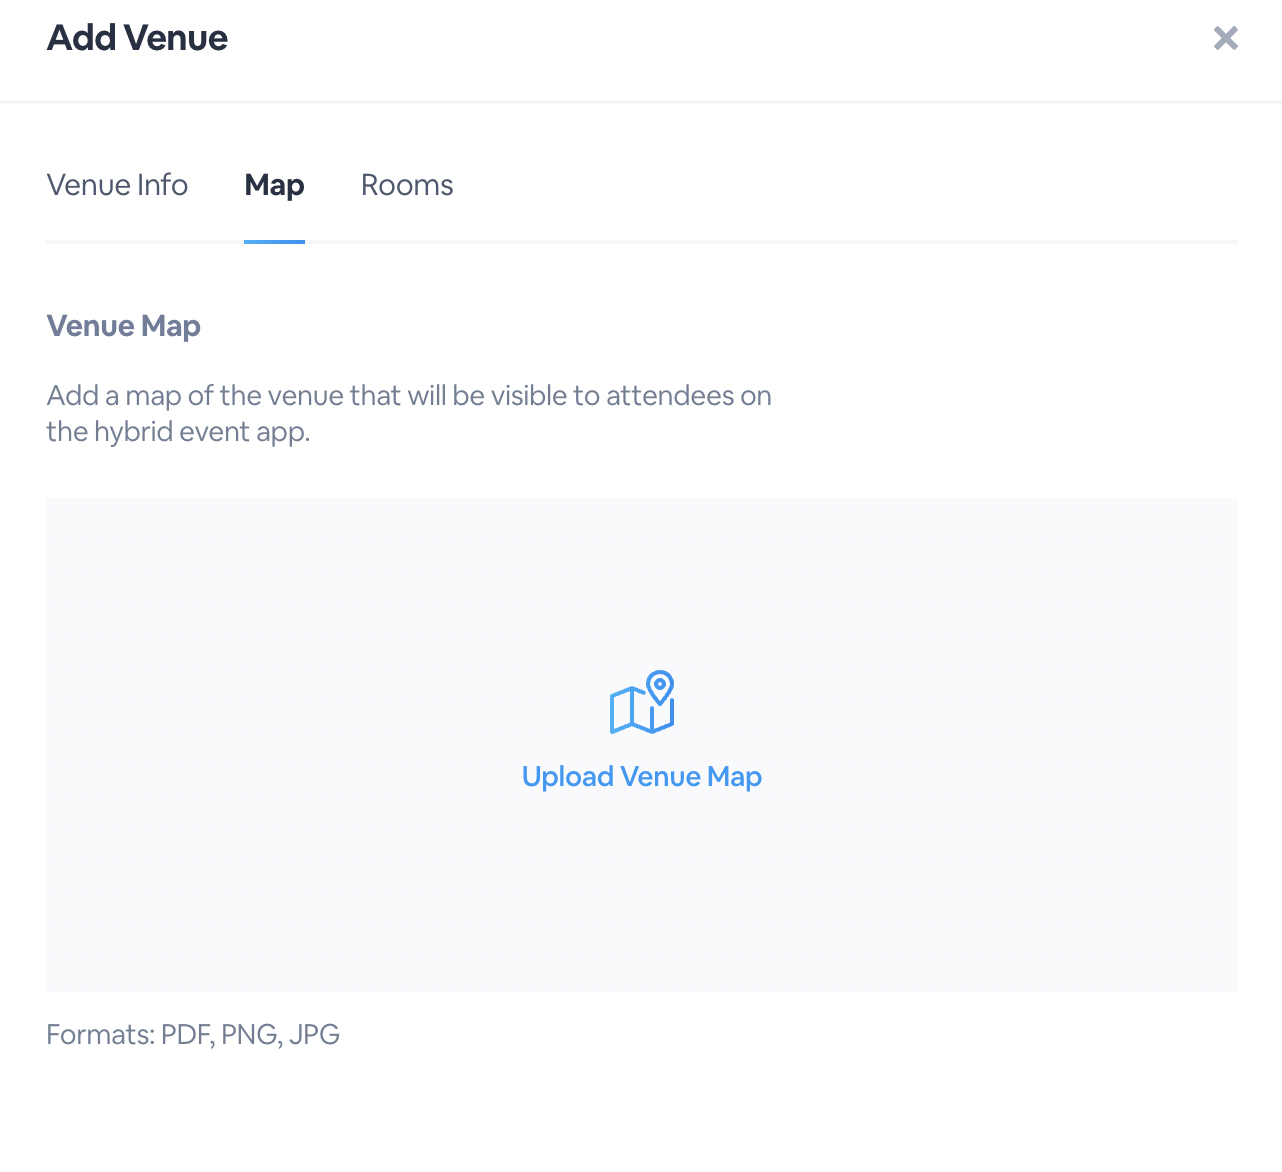
3.Click to the Maptab, then enter an image file of your venue's map. We recommend a 962x1391.png file
5.Click to the Roomtab and click Add Room.Enter in the room's info:
-
- Room Name- title of the room name
- Capacity- amount of attendees allowed in the room at the same time
- Map- a map of the room.Click thethree dotson the side and thenAdd Map.
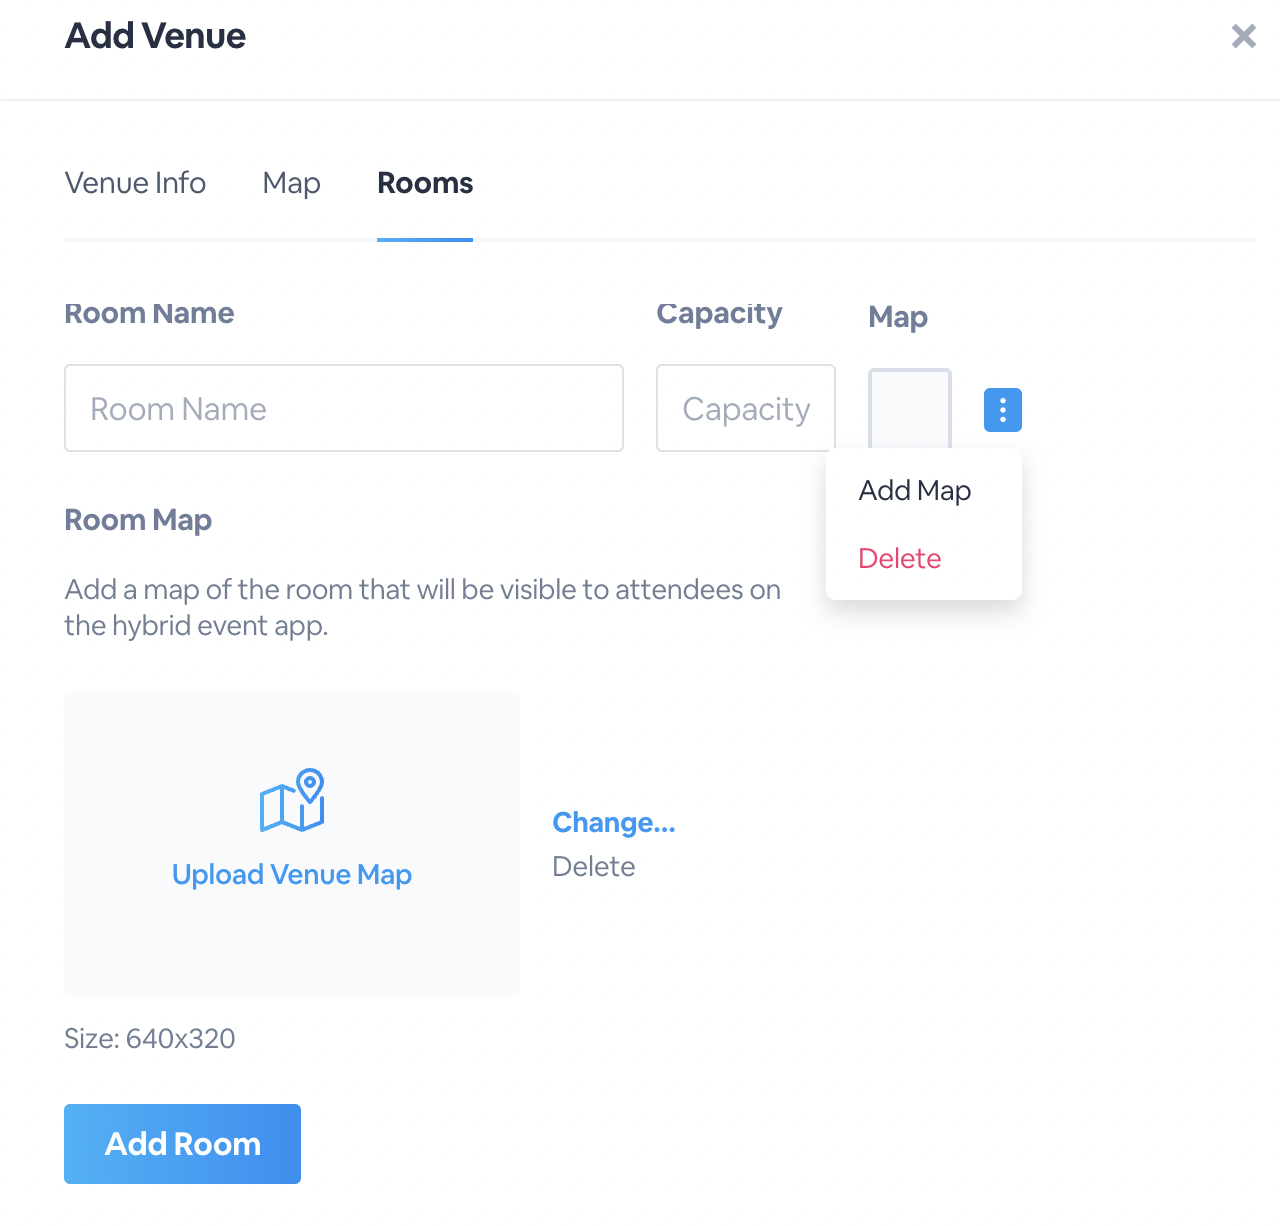
6.Click Save & Exit
When attendees are in a session and clickView Map, their first screen will show the entire venue's map while the second screen will show the individual room map.
If you would like to disable checking into sessions, on theMobile Appsection of your Hybrid Event's backend, you can check offdisable session check-in.

This will prevent attendees from having a QR code to scan for checking into the session.Below is an example of a session with and without the check in enabled.
With Check In Enabled: With Check In Disabled:
.png?width=214&name=Image%20from%20iOS%20(2).png) .
.%20copy.png?width=213&name=Image%20from%20iOS%20(1)%20copy.png)
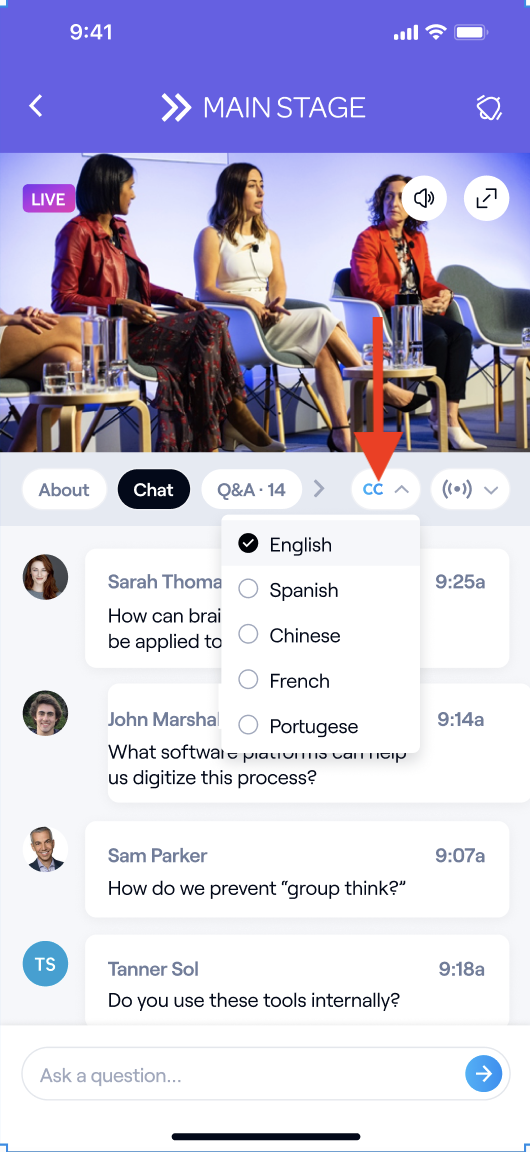
Note:Closed Captionsis a paid, add-on feature that needs to be enabled by a BigMarker admin.If you are interested in closed captions for your next event, talk to our Event Experts atsales@bigmarker.com
Add closed captioning to all your live sessions, so attendees can watch the session with separate subtitles.Go to the session's settings on theEdit Webinarsection, then enableClosed Captions.Set the session's streaming language, and then the languages that closed captions will be available in the equivalent dropdown boxes.

From there, inside the Companion App, attendees will see the CC icon to start to view the session with closed captions.

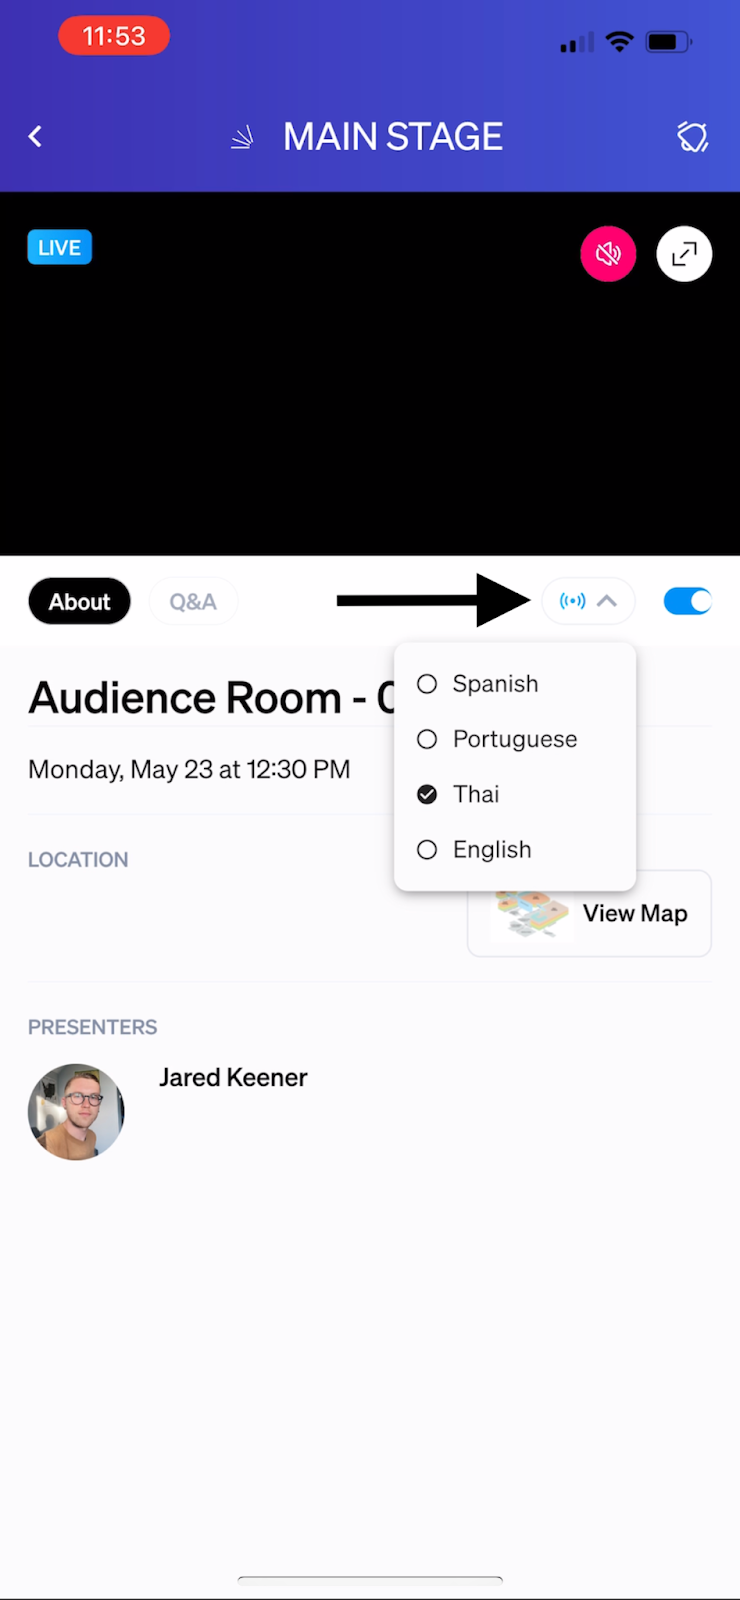
Setting Up RTMP
You do have the ability to stream your sessions with RTMP and multiple language translations.To do this, you will need to go to the session's backend and enable onNative RTMP StreamingandGenerate Secondary Stream Keys.To learn more about setting up multiple language translations, click here.
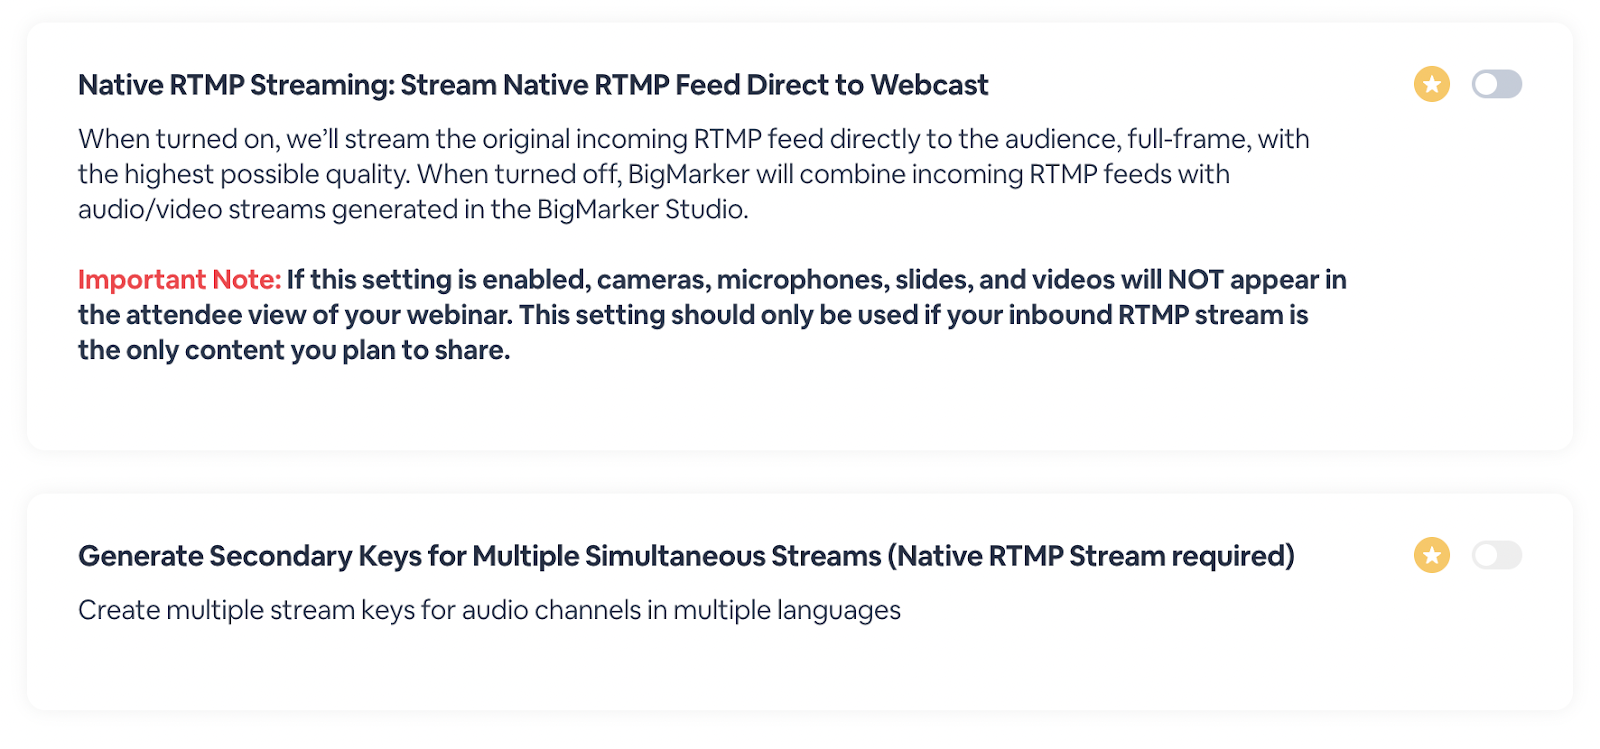
What this will do is enable live translations within the session on the Companion App for attendees to stream.They will be able to click thestream iconto switch between the different languages.
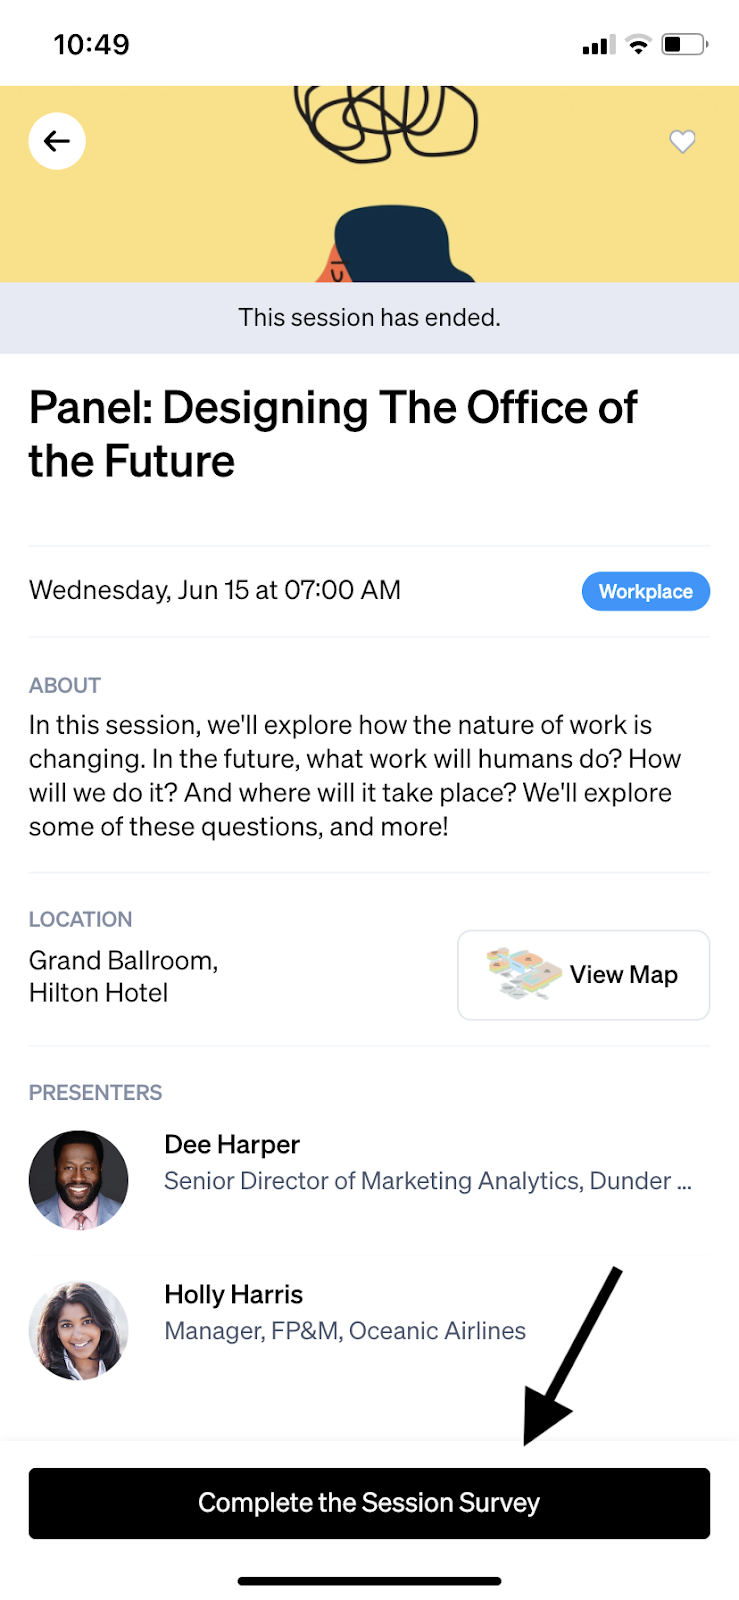
Setting Up Surveys
Last but not least, within sessions you can set up Surveys.You will need to contact your BigMarker Representative to have our Development Team enable surveys within your companion app.
Once enabled, you are able to go within the Session'sManagesettings andManagetheSurveyby going to the backend and adding the survey question you'd like.To learn more about surveys, click here.
Here is an example of a survey in the Companion App:

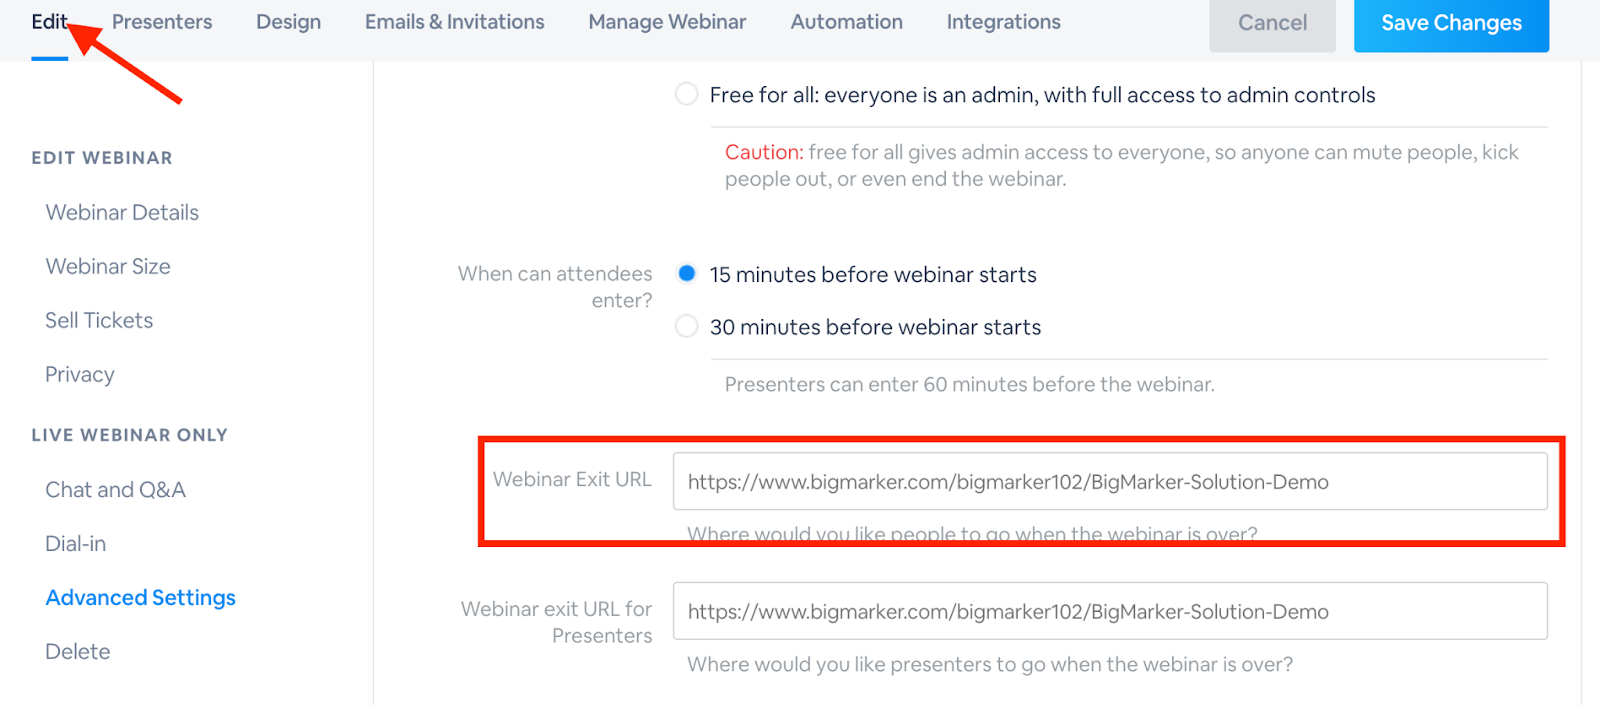
You can redirect your attendees to an external survey link or a BigMarker survey after the session has ended.For external links, go to theEditsection of the session and enter the URL in theWebinar Exit URLsetting.This will redirect the attendee to the URL when the session has ended.
If you are looking to redirect the attendee to a BigMarker post-webinar survey, go to yourWebinar Surveysection, then the settings tab.From there, enableShow the survey immediately after the webinar ends.

Setting up the Networking Center
Your attendees are able to connect and network with other attendees within the Networking Center.The Networking Center will operate the same as our browser-based Networking Center with additional features that include connecting via QR code.
How to Set up the Networking Center
1.Go to the Event Modulessection and enable on the Networking Centermodule
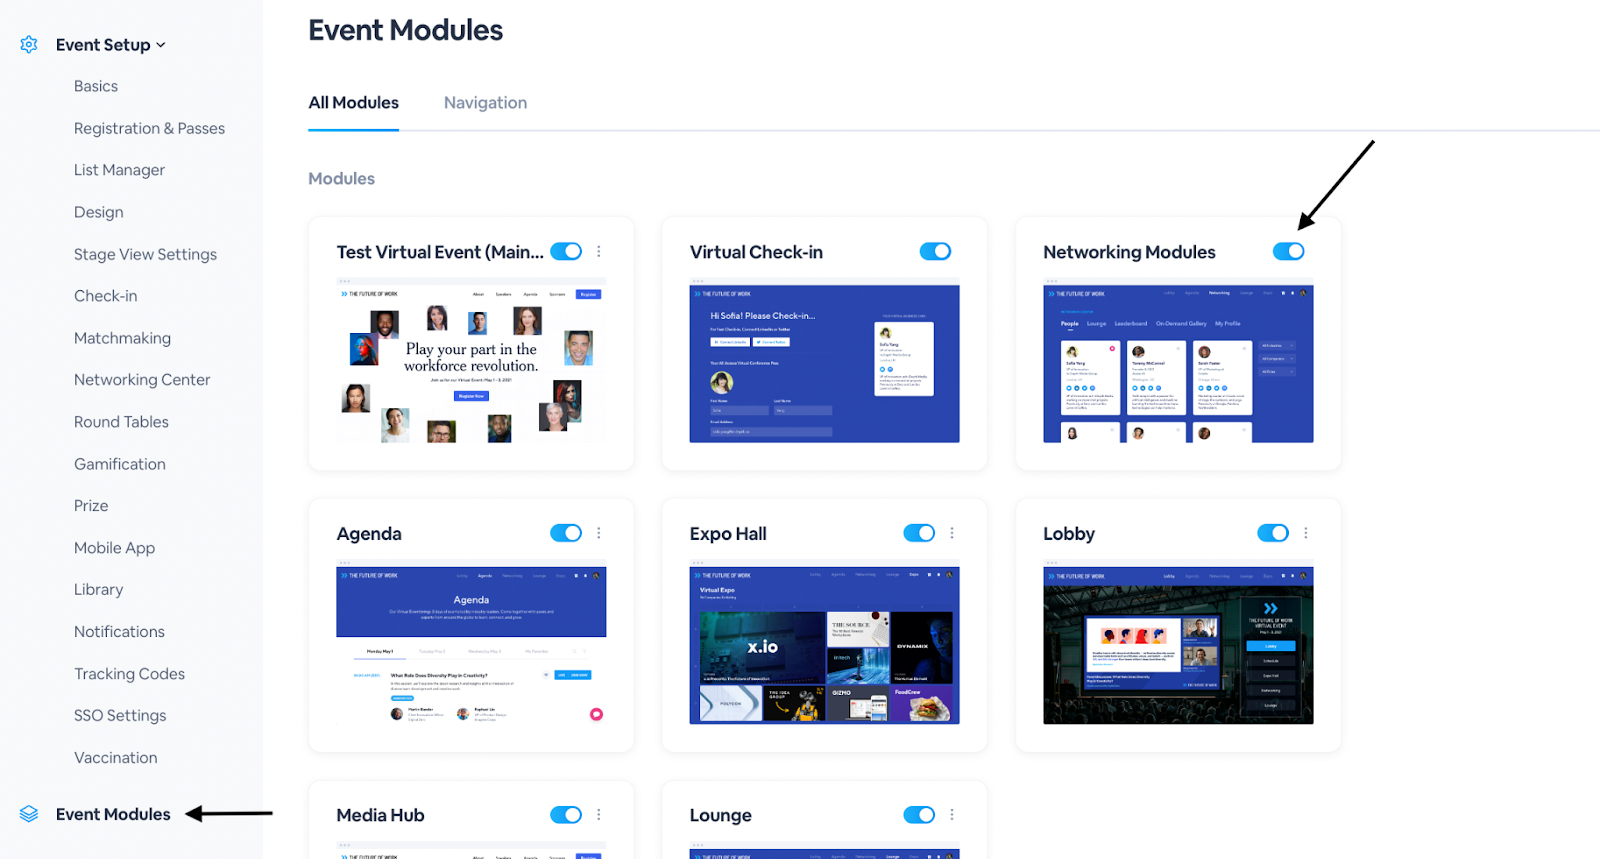
2.Next, go to the Networking Centersection on the left hand side and toggle on Peopleand My Networkmodules.

From there, your attendees will be able to send connection requests, view a directory of attendees and chat with their connections.
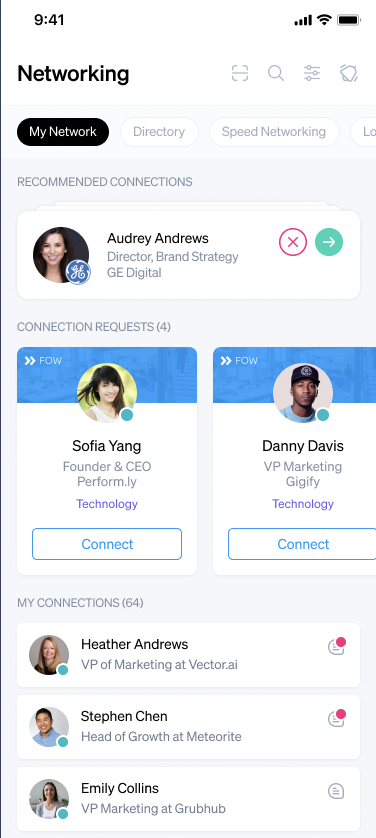
Here is an example of the Networking Center in the Companion App:

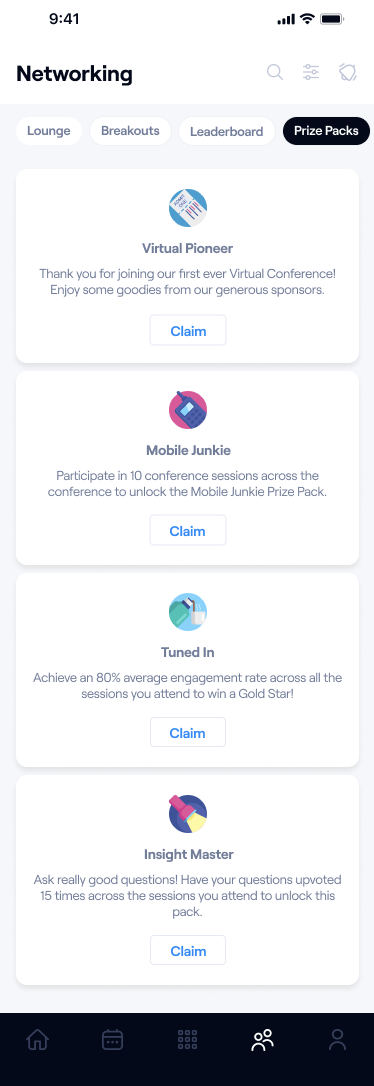
Display your Prize Packs in the app to foster a healthy competition amongst your attendees.In theNetworking Centersection, toggle thePrize Packsmodules.

From there, navigate to thePrizessub-section and create your Prize Packs.ClickNew Prizeto create a Prize Pack orEditto edit the Prize Pack information.
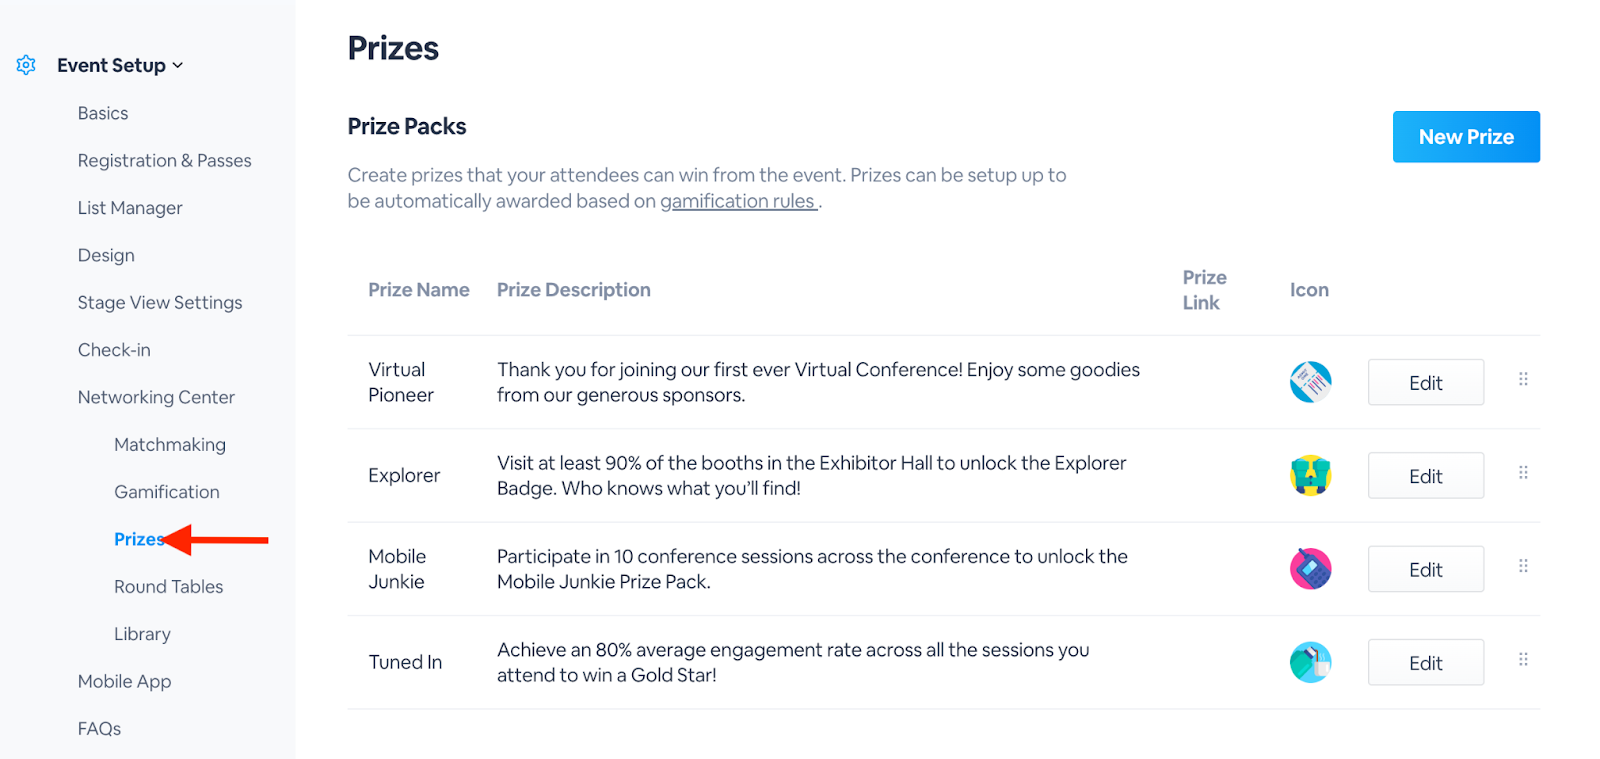
When creating a new Prize Pack, you will need to enter in the prize name, description, the claim button text and an icon.

The Prize Packs will be located on your event's companion app networking center.When attendees click to the Networking Center, they can see a separate Prize Pack section to view all the available prizes.Only when gamification is linked to a prize pack, and attendees have qualified for enough points, will they be able to claim the prize pack.
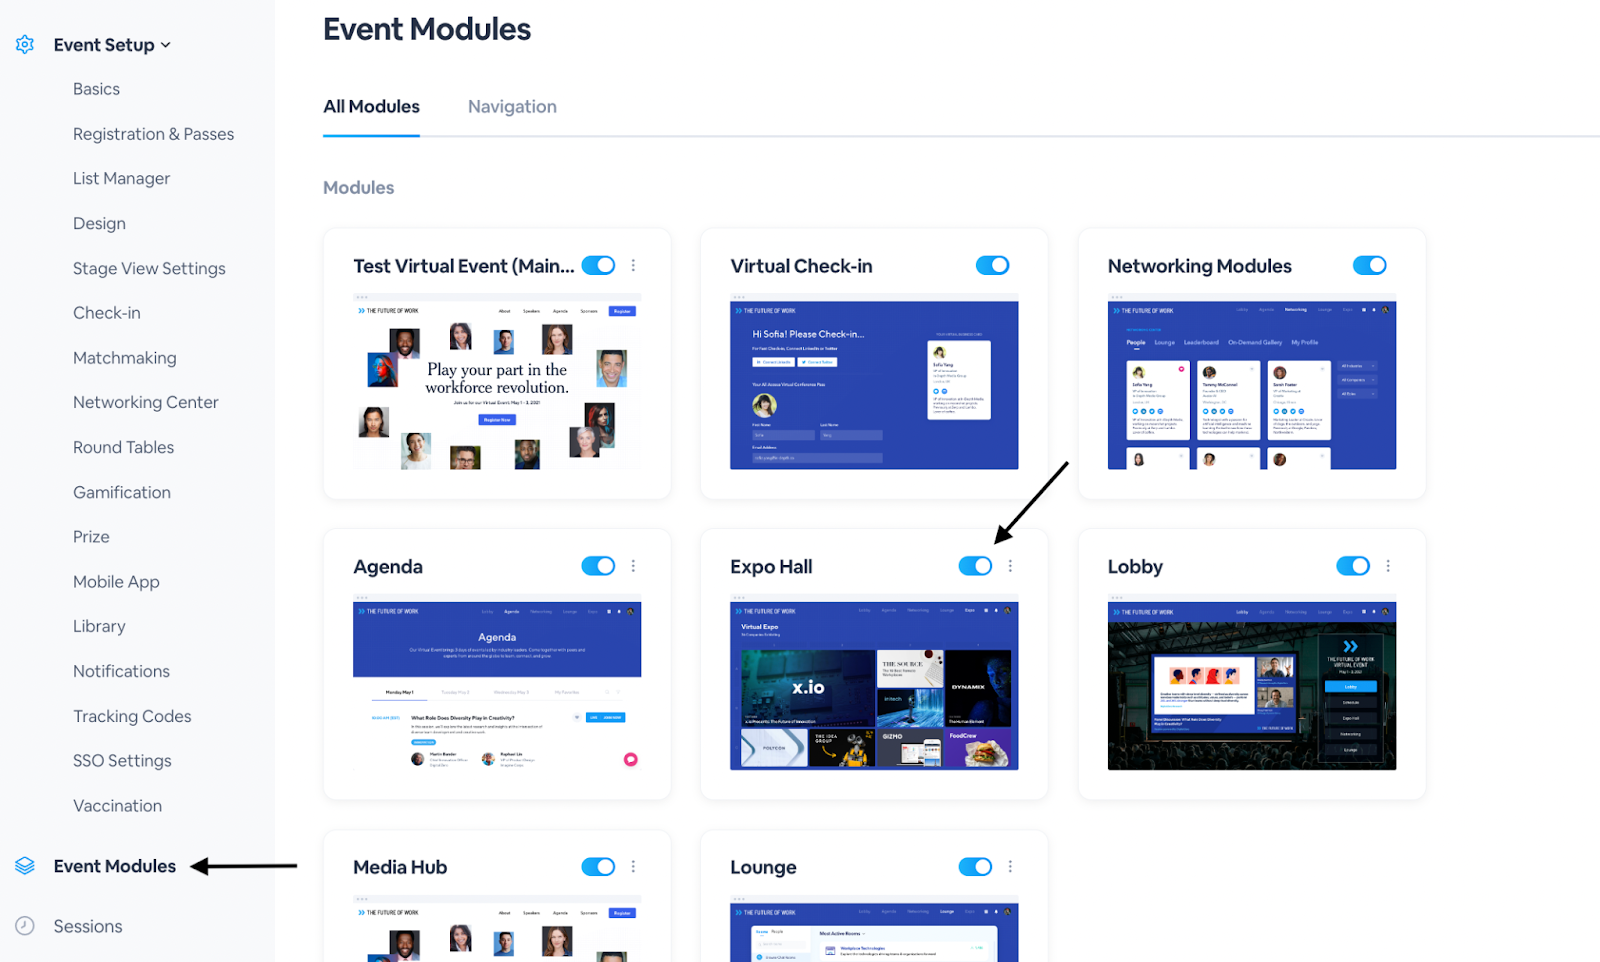
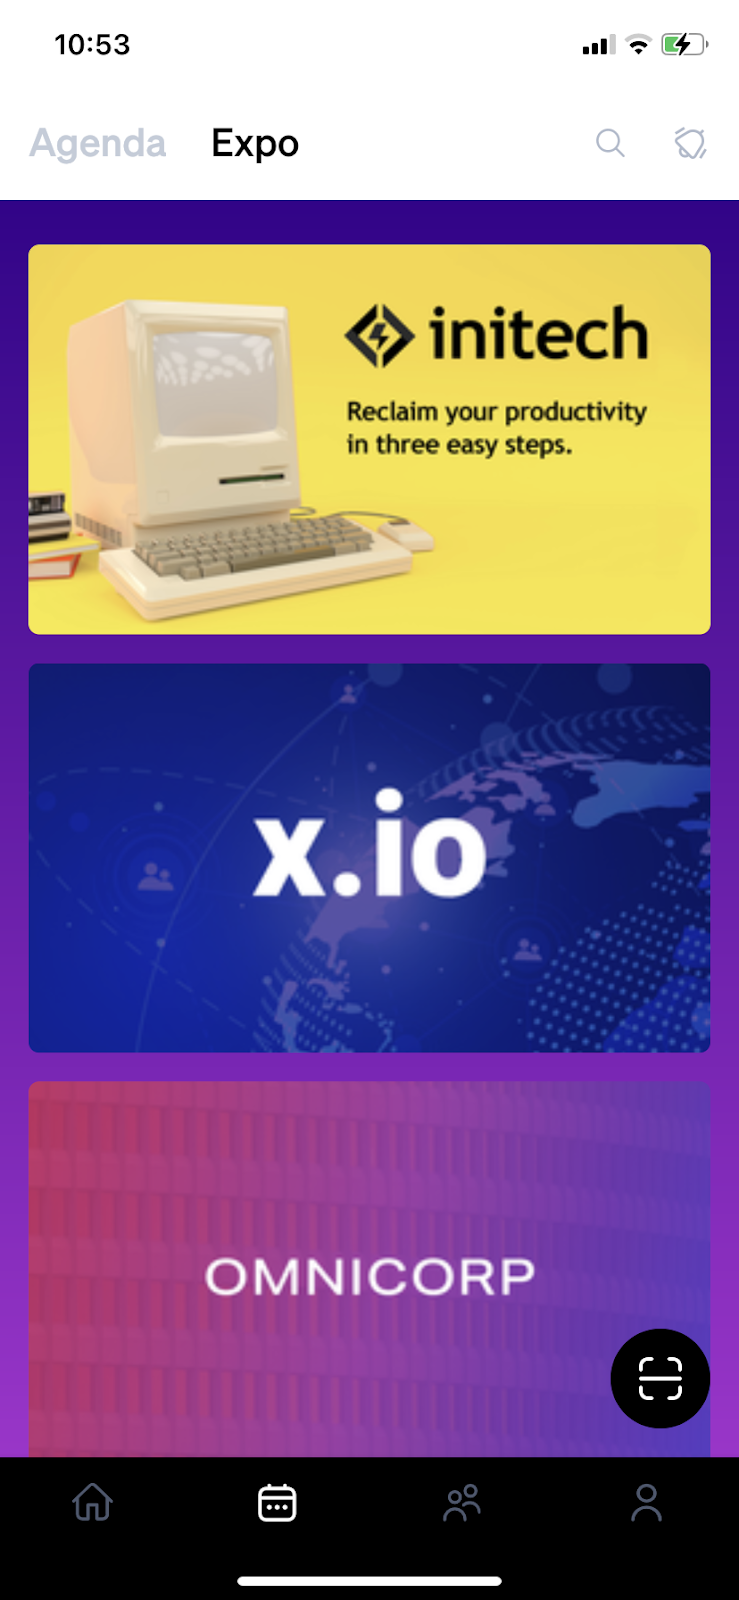
Setting up the Expo Hall
Create specific exhibitor booths within your app in the Expo Hall.Attendees can scroll through, view the different booths and check into the booths from their app while visiting them in-person.
How to Set up the Expo Hall
1.Go to the Event Modulessection and enable on the Expo Hallmodule
2.Next, go to theMobile Appsection on the left hand side and click to theMobile Expo Halltab
3.Enable onDisplay Expo Hall in Mobile App
4.Select the style of layout for the Expo Hall: Large Cardor Agenda Style

5.Click Save Changes
Here is an example of an Expo Hall (in Large Card layout) in the Companion App:
Your Companion App is now all set up!Attendees can download the App from the App Store or Google Play to fully immerse themselves both in-person and virtually with your event.If attendees would like to delete their profile, they can go to their profile and click the three dots at the top to delete their profile and information.
Applying a Search Filter to the Networking Center
It is now possible to apply a search filter while using the Networking Center in the Mobile App.The filters are connected to the registration fields that already exist within the app.
Simply click the Networking Section, go to the Directory tab and select the filter icon.You can filter by details like industry, session or day.Apply your filters and the app will populate results with only the individuals who met your filter criteria.
